These were another fun project for a boy's room for some good friends of mine. I'm a fan of large pieces of art in a room, and certainly when you can create something unique - all the better. In my opinion - larger pieces create a more pleasing and clear focal point in a room, as opposed to a lot of small things cluttering up a space.
The fabric was left over from the window valence and pillow I sewed for the same room. It was this leftover fabric that inspired the wall art. It was one of those situations - "I have a bunch of this striped fabric, so I must figure out something to do with it". The pieces were big enough to create something interesting for the wall. Another source of inspiration came from the wooden school of fish we had already set up on the opposite wall of the room
The fish were stained a dark brown and I felt that carrying that stained look forward with larger wood pieces, and using the fabric as a background would work just fine. Ultimately, I determined I had enough fabric to do three separate pieces. See the post for the school of fish here.
Here's the process I went through to create the wall art panels...
THE WOOD CUT-OUTS
I must admit I can't take all the credit for these. The boy's father (thanks Ryan) took care of cutting out the wood pieces after I provided the paper patterns. After he cut them out for me, I stained them and put a coat of polyurethane on top.
STAINING THE WOOD CUT-OUTS
I used a gel stain and applied it with an old T-shirt rag. I always wear plastic gloves when applying stain this way.
 |
| Gel Stain |
 |
| Applying the Gel Stain |
A small artists brush was used to get stain into the crack and crevices I could not reach with the T-shirt rag.
 |
| Applying the Gel Stain |
I finished off the stained cut-outs with a coat of satin polyurethane. I like this stuff because it is water based and I think it is easy to work with and easy to clean up.
 |
| Clear Coat After Staining |
DRILLING HOLES TO ATTACH CUT-OUTS
24" squares of MDF were cut out for the base for these pieces. Our friend had scrap pieces laying around so this is what was used. The material itself (MDF) is not so important since they would ultimately be covered in fabric. Before covering the boards in fabric however, I needed to drill some holes that would enable the cut-outs to be attached to the boards. I thought about this for awhile because I wanted all the holes pre-drilled. Here is what I did:
(1) I placed the wood cut-outs on the square boards and determined the exact placement.
(2) I traced around the cutouts onto the board.
(3) I removed the cut-outs and marked where I wanted the holes to go for the screws that would hold the cut-outs in place. I chose to do 3-4 holes on each piece.
(4) I drilled the holes all the way through the boards.
(5) Next, I held the cutouts in place on the boards (using where I had traced around them previously as a reference for placement).
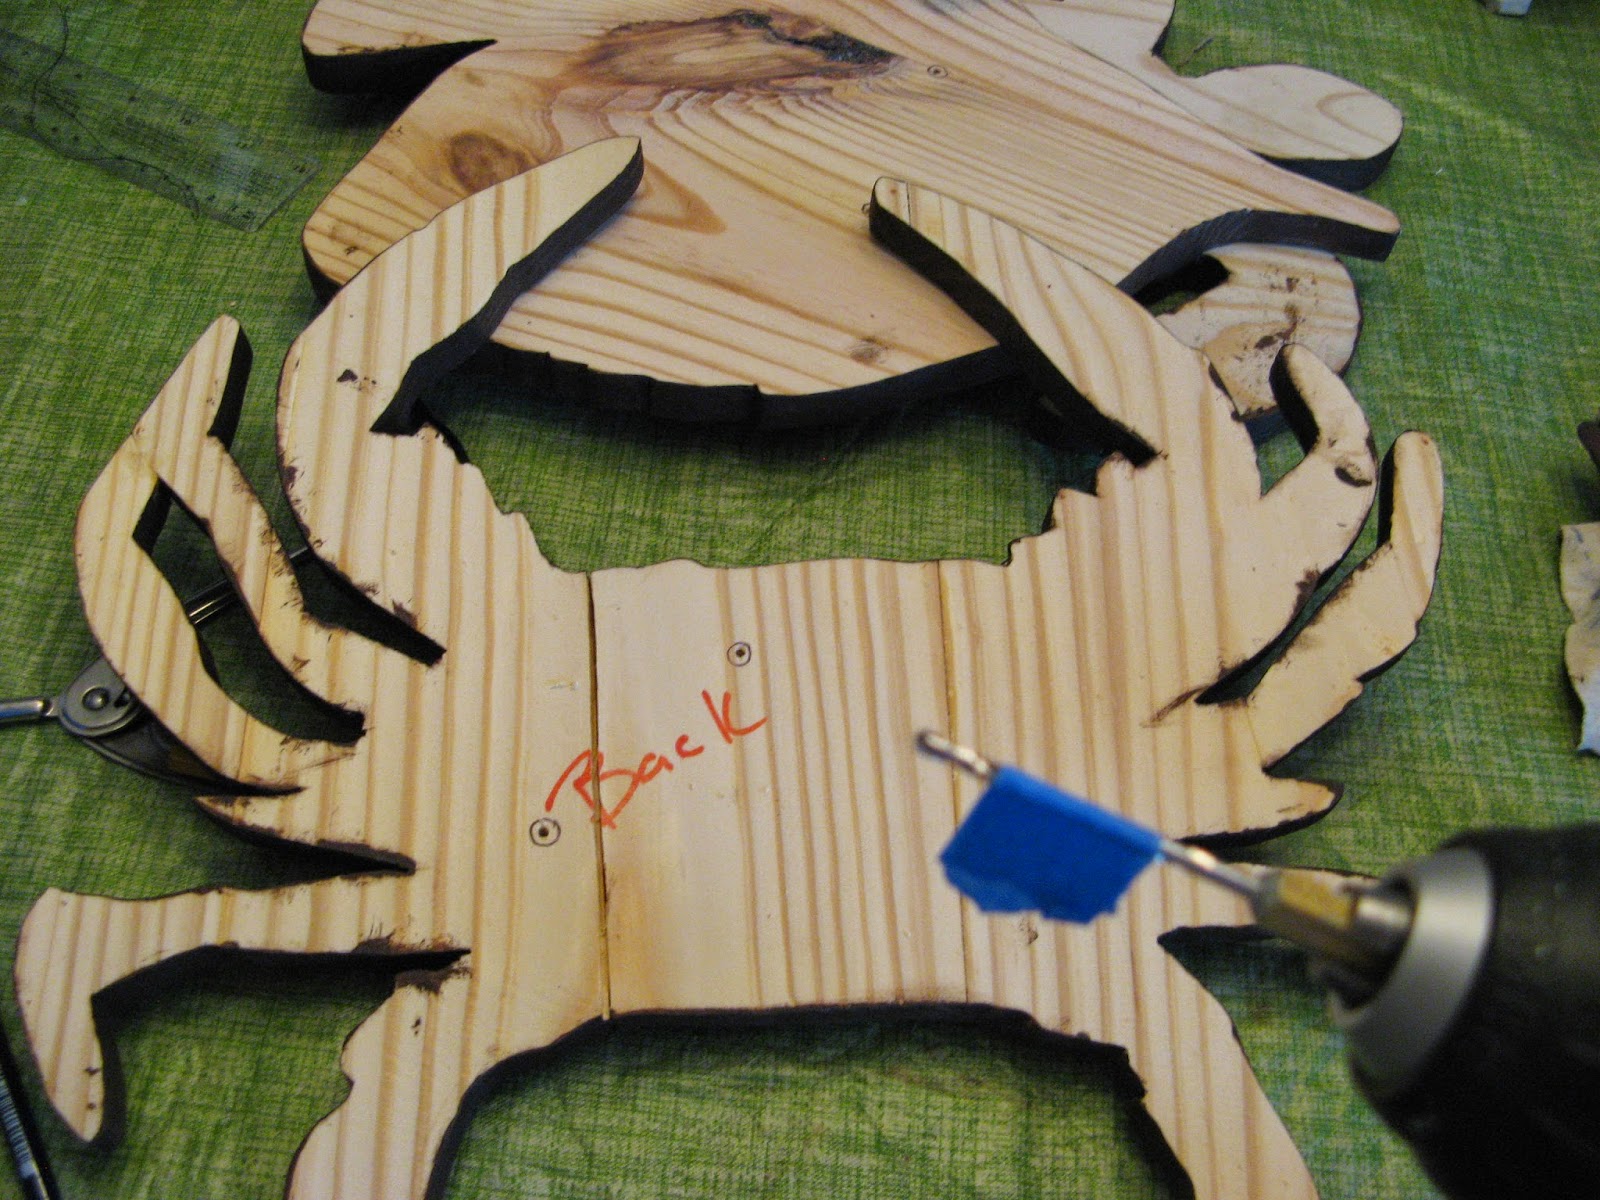
(6) Then I took the pointy part of a compass and pushed it through the back of the board (through the holes) to make marks where the corresponding holes would go on the cut-outs. You can see in the photo below where the points I marked with the compass have circles drawn around them with a pen.
(7) Last, I drilled pilot holes into the back of the cutouts. I was very careful to not drill too deep, and used masking tape on the drill bit to make sure I would not drill to far (see tape on drill bit in photo below).
The holes I drilled will be important for later. Next I had to cover the boards in fabric...
COVERING BOARDS IN FABRIC
It was easy to cover the square boards with fabric. All I had to do was staple the fabric to the back, starting with the sides first, leaving the top and bottom undone.
The fabric was on the heavier side so making the corners neat took some planning. I stapled all the way to the edge of the corner...
Then I folded the corner in (much like wrapping a present, and stapled it...
Then I folded the second flap up, and stapled it...
After all four corners were done, I stapled the rest (the middle) of the top and bottom sides...
Then I trimmed the excess fabric...
HANGING HARDWARE
I paid particular attention to the hanging mechanism on the back since these are a little on the heavy side. I used metal hangers screwed in to the back of the particle board, with picture hanging wire to be used across the middle connecting the hangers.

Remember those holes I had drilled earlier? (In both the boards an part-way through the stained cut-outs?) That is how I attached the cut-outs to the boards. I pushed the screws through the back of the panels, and through the fabric, and then matched them up with the holes on the back of the stained cut-outs. Lastly, I just had to tighten down the screws to attach the -to the boards.
Here are the finished products after the stained wood cut-outs were attached...


No comments:
Post a Comment