Storage space was a big issue when moving into our Florida cottage fulltime. We were downsizing from 3600 square feet to under 2000. Needless to say, we had to declutter our lives and make the adjustment to smaller spaces. Our master bathroom was a good example of a significant adjustment to a smaller space. We were losing a linen closet. Everything needed to fit under the sinks or on the set of shelves we had just put up in a niche on the wall (those shelves created a great place to store towels and I used two large baskets to store our stash of toilet paper and facial tissues). See photo below:
 |
| Shelves in niche for towels and baskets |
The bar in the above photo, is a solution to hang dry laundry. Our washer and dryer fit in a very small laundry closet, so this is the only space we could come up with for this purpose. The bar is removable, so I can take it down when not in use.
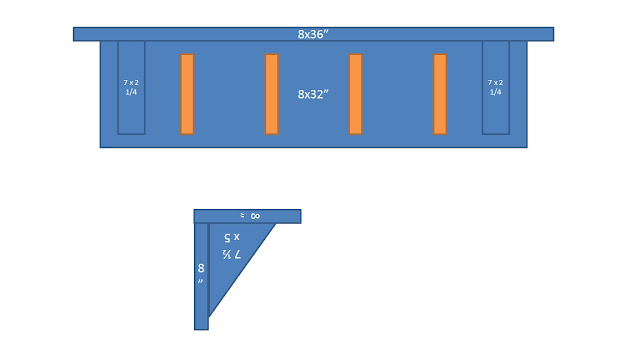
Still on the lookout for more storage opportunities - I came up with the following. Originally, we had hooks on the wall to hang towels and my bath robe, but I wasn't crazy about how it looked. I felt like we could make it look better, all while adding a little more functionality (integrating the hooks within a shelf to allow for even more storage). Here is the plan I dreamed up in my head. The orange bars in the graphic below represent the hooks.
 |
| Plan for Cottage Style Shelf |
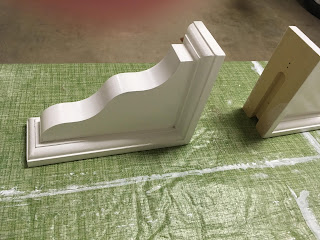
It's actually even more simple than the plans seem to indicate. See the below photos - it's just two pieces of wood and a couple shelf brackets. I was able to go to Lowe's and have them cut the wood boards to the lengths I wanted, and I found the pre-made shelf brackets there as well. That's it for cutting - no need to do any more cutting at home.
SUPPLIES
- 1x8 for top of shelf
- 1x8 for back of shelf
- 2 shelf brackets (These were from Lowes)
- 4 Hooks (I think I bought these at Target years ago)
- Screws
- Primer & Paint
- Wood Filler
 |
| Painted Shelf Pieces |
I pre-primed and painted the shelf pieces. (Two coats of primer and two coats of paint.) I knew I would have to use wood filler and touch up the paint after attaching the pieces with screws and mounting it to the wall, but that was OK.
 |
| Painted Shelf Brackets |
Screws were the only other items I needed to complete this project. In my miscellaneous jar of screws, I found some long flat heads. The flat heads were important as they would enable us to counter-sink them a bit, so I could fill in with wood filler over top of them and hide them altogether. We drilled pilot holes for every screw so that we didn't have any issues with the wood splitting.
STEP 1: Installing the brackets to the back of the shelf piece. I used four screws to mount the brackets to the back-plate of the shelf. (two through the back of the shelf going forward into each bracket, being careful not to poke through the front of the brackets).
STEP 2: Installing the top shelf piece to the brackets and back piece. I used five screws to connect the top to the back and brackets. (two through the top of the shelf down into each bracket, being careful not to poke through the front of the brackets; one from the top/back of shelf down into the back plate of shelf )
STEP 3: Mounting the shelf to the wall. I used four screws to mount the shelf to the wall (through the back piece and into wall studs.) NOTE: the screws were not "centered" on the shelf but they were spaced well enough to support the shelf, and I knew I would be covering up the screw heads with wood filler anyway, so the fact they were off-center didn't matter to me aesthetically.
Let me say that because the shelf was screwed into two wall studs - I am confident that it can hold the towels in addition to the items on top. I would highly recommend finding a spot where wall studs are available, otherwise the whole setup might be precarious if using only something like drywall anchors.
It was necessary to calk between the pieces and also where the shelf met the wall. I was hoping to skip this step, but my husband was right - it looks a lot more finished and professional. After completing the calking, it looks like it's been there since the house was built and was meant to be there.
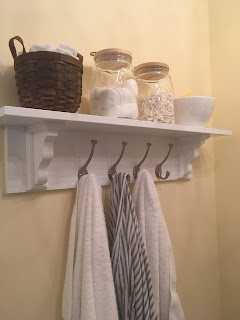
I have to admit - overall the shelf does not provide for all that much more storage, but it does provide a little, and I think it looks cute. The glass jars and bowls were purchased at Homegoods, and the small brown basket at Tuesday Morning. The jars hold a large back-up stash of cotton rounds and Q-Tips. The bowl is storage for extra bars of soap, and the basket is where I keep a small supply of wash cloths within reach of my sink.
Next project on the master bathroom - replacing the large plate glass mirror over the vanity area with oval tilt-style mirrors, and painting the whole bathroom a soft blue that matches the quilt in the master bedroom. The soft yellow paint is pretty, but there is a lot of it in the house and I have wanted to break it up a little more by painting the master bathroom. Another project for another day...
Next project on the master bathroom - replacing the large plate glass mirror over the vanity area with oval tilt-style mirrors, and painting the whole bathroom a soft blue that matches the quilt in the master bedroom. The soft yellow paint is pretty, but there is a lot of it in the house and I have wanted to break it up a little more by painting the master bathroom. Another project for another day...
For more beach cottage posts see my Beach Cottage page.


No comments:
Post a Comment