Tuesday, October 9, 2012

FAUX STONE PAINTED VASE


Faux Stone Painted Vase Series
 
This vase is part of a family room makeover I did for a friend.  We were challenging ourselves to stick to a strict budget, so I came up with some fun projects like this one.  The vase was free (part of a floral arrangement I received), the faux gems were leftover from last Christmas, and the can of faux stone spray paint was $9.99.  I realized I probably could have bought a cream vase for around the same price of the spray paint, but it would not have been nearly as fun   ;o)    (In my defense,  I still have half a can of spray paint left, so in theory I only used $5 worth and have enough for another project.)

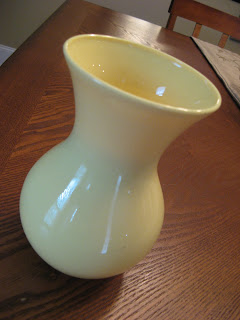
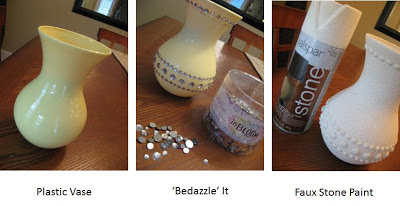
I started with this plastic yellow vase.  The idea of this project was to embellish it for texture and paint it with a spray paint.  The result is a textured faux stone look.

Plastic Vase
 

Supplies

1.       Plastic Vase (or a vase of any material that is easily paintable)

2.       Sand Paper

3.       Faux Gems (color does not matter – they are just for texture)

4.       Marker and Ruler to draw design on base.

5.       Glue (I used hot glue, but I recommend another adhesive so you don’t have to worry about the ‘strings’ from the hot glue gun mucking up your project)

6.       Spray Primer

7.       Spray Paint  (I used Valspar Stone purchased at Lowe’s).  You could go with a standard high gloss spray paint, but you would have to be really neat and clean when gluing on the faux gems.  As I mentioned above, if you use a hot glue gun, this could be really tricky.  The textured spray paint covers up a little bit of a mess with the glue.

Steps
1.       Lightly sand the vase first.  It will help primer/paint adhere

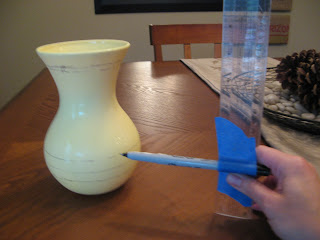
2.      I drew a few lines around the vase to give me a guide when gluing the faux gems.  Use the technique in the photo below – attach the marker to the ruler and spin the vase to draw a consistent line.

Drawing Consistant Lines Around Vase with Ruler and Pen
 3.       Glue the faux gems to the vase in whatever pattern you wish.  These were left over from my Christmas décor’ from last year.  Despite the volume I had used last season, I still had a bunch left in the container.   If you use a hot-glue gun be very careful to avoid leaving any ‘strings’.  As you can see from the end product – it does not matter what color gems you use as the end result will be covered in primer and paint.  They are simply used for texture.  With that in mind – I’m sure many different materials could be used to create texture here in a similar manner.
Plastic Vase with Faux Gems

4.       Prime the vase.  If you look closely at the photo below, you can see how I did not initially pay attention to the hot glue strings.  As a result you can see this when the primer was applied (Uggghh).  It really looked awful.  I spent a lot of time peeling off pieces of glue with tweezers to clean it up.  Next time I’ll use a different type of adhesive.  I should have stuck with my all time favorite 'Weld Bond Glue'. 
Primed Vase
 
 
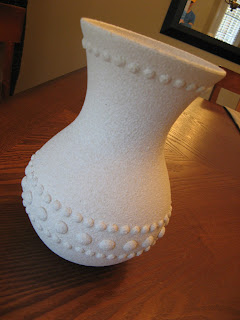
5.      Paint the vase with the faux stone paint.  This will cover up the inconstancies with any adhesive (it worked quite well to conceal any remaining hot glue issues).   I used several light coats as recommended on the can.  I think I ended up doing about four coats.
 
 Faux stone painted vase


Faux stone painted vase

 
Here it is on the mantle filled with red berries... :o) 
Faux stone painted vase on mantel
 

BASKET FLOWER WALL ART


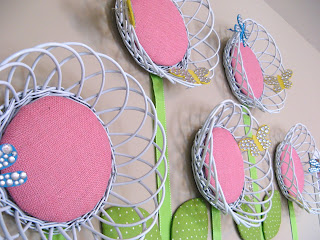
Basket Flower Wall Art Close Up

These were made for my friend Heather’s little girl’s room.  She's the one who lets me play ‘decorator’ every once in a while.  This project came about quite by a mistake.  We had originally bought these baskets for another purpose for their home, but as I stared at them on the floor, I was taken aback by how much they resembled flowers.    I am very lucky to have a friend who lets me run with my crazy ideas!

Basket Flower Wall Art Group
 

This was an ‘on the fly’ project - we just made it up as we went along.  I love these types of projects and the collaboration with friends to come up with unique ideas and solutions.  My friend Heather doesn’t give herself enough credit on this one – she chose the leaf shape from the options I gave her, as well as the ultimate layout of the flowers and the stems.   Here is an explanation of the individual components…

Basket Flower Wall Art 1-5
 
(1)    Wooden dragon fly (and butterflies) painted and ‘bedazzled’ with faux gems.

(2)    Green Grosgrain Ribbon.

(3)    Cardboard leaves covered in quilt batting and cotton fabric.

(4)    Cardboard circles covered in quilt batting and pink burlap.

(5)    Baskets spray painted high gloss white.

Here are the supplies and steps we took to make them...

What you need

·         Baskets resembling flowers (we bought ours at Old Time Pottery)

·         Spray primer

·         White high gloss spray paint

·         Hot Glue Gun

·         Corrugated Cardboard (old boxes are fine) - enough for circles within flowers, and leave shapes

·         Fabric – enough to cover circles and leave shapes (we used pink burlap for the circles and a green and white dotted cotton for the leaves).

·         Quilt Batting – enough to put 2-3 layers between fabric and cardboard for circles and leaves

·         Grosgrain Ribbon – for stems

·         Nails to hang baskets and adhesive to apply leaves to wall (we used packing tape and it’s still holding strong).  3M might have some other options.

·          Wooden dragon flies and butterflies and faux gems.  Both were purchased a Hobby Lobby.

·         Acrylic paint for dragon flies and butterflies
 
Basket Flower Wall Close Up
 

Steps

(1)    Spray the baskets with primer.

(2)    Spray the baskets with white high gloss paint

(3)    Cut out cardboard circles to fit inside the baskets. 

(4)    Cut circles of the same size out of quilt batting (2 or 3 layers is good for each piece of cardboard), and lightly hot glue to cardboard pieces.

(5)    Cut fabric circles about 2” larger than the circumference of the cardboard pieces and wrap them around the cardboard and batting, securing with hot glue on the back side.

(6)    Repeat steps 3-5 for the leaves.

(7)    Cut the ribbon for the stems and hot glue the top of the ribbon stems to the back of the baskets.

(8)    Hang the baskets with nails. Adhere the stem to the wall with adhesive if necessary (ours hung behind the bookcase so it was not necessary).  Adhere the leaves to the wall with adhesive.

(9)    Paint and bedazzle dragon flies and butterflies.  Hot glue twist ties to back of each to attach to basket.