Friday, March 15, 2013

VINTAGE JEWELRY ART

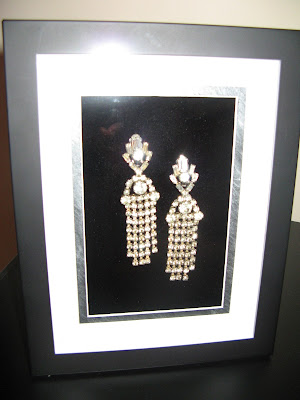
Art Deco Jewelry Earrings Framed Art


This was a birthday gift for a friend of mine.  She is in the process of putting together a sewing room and I was inspired by her art deco theme she is incorporating - particularly the sparkly art deco chandelier/pendant light she picked out.

I'm a big fan of unique artwork and I'm convinced you can frame almost anything.  I began my search on ebay with a key word search of "rhinestone art deco".  I found several cute broaches and other pieces, but these earrings were my favorite.

The key to making this work is to use a shadow box, or in this case - I found a frame with some depth to it to allow for room for the earrings to fit inside the frame.  The frame was purchased at TJMaxx.  I modified the mat that came with it slightly.  It was a black mat and I used silver metallic acrylic paint with a dry brush technique to create the silver textured effect on the mat.

The background is black velvet.  Spray adhesive was used to adhere it to the cardboard that came with the frame.  I simply sprayed the cardboard with the adhesive and waited a few minutes.  Then I laid the adhesive side down on the back of the fabric (which was laid flat, face down on the table).  This insures the fabric does not have any wrinkles when attaching it to the cardboard.


The earrings were stitched to the velvet.  I considered using hot glue, but I thought that might end up looking horrible and messy.  Stitching the earrings on was more time consuming.  I found I had to reposition one of the earrings a few times - but I think the end result was worth it.  I think globs of glue would have ruined this piece.


Overall I like the way it turned out.  The silver painted mat ended up being a nice touch and the black velvet creates a great backdrop for the rhinestones.

See my other post using antique copper jewelry as art.

STARFISH PILLOW

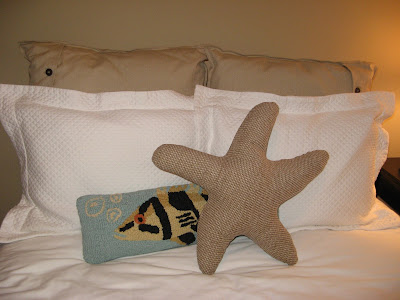
Starfish Pillow - Ocean, Under the Sea Theme, Ocean Theme


This was a recent project for my friend's little boy.  I am helping redecorate his bedroom and there is an ocean theme.  I spotted pillows like this on Etsy and thought it was a project I could tackle myself.  My friend found a very cute Pottery Barn Kids comforter to use in his room, but here I'm just displaying the pillows on one of my own beds.  Isn't the fish pillow in the back cute? - I found it on Sierra Trading Post and got a super deal on it.

The great thing about these types of projects is the amount of fabric needed is so small that you can easily find what you need from a remnant pile at a store.  I found this beige upholstery fabric with a little texture and thought it worked nicely  The texture reminds me of what I've seen on real starfish.  For $6 per yard - I purchased 3/4 of a yard and had plenty.  Not bad for about $4.50 worth of fabric...

Starfish Pillow - Ocean, Under the Sea Theme, Ocean Theme


I made my own starfish pattern from looking at pictures.  I think the key to making it look good is that it needs to be not-so-perfect - otherwise it would look like just a "star" pillow and not a starfish pillow.  Make some of the legs smaller/larger, not so straight.  I stuffed it with polyfill and used a reasonable amount so it will keep its shape.  Also, I would recommend - don't make the legs too skinny or too fat.

Starfish Pillow Paper Pattern


If you don't sew, check out Etsy to find some handmade options to purchase.

Tuesday, February 19, 2013

BOOT HOLDERS


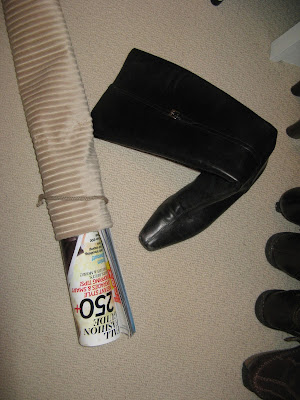
Boot Holders
 
I have been holding onto a lot of scraps from my upholstery fabric projects for awhile now, and was delighted to come up with this project.  Prior to sewing these boot holders – I had been using rolled up magazines inside my boots to prevent them from flopping over on the floor of my closet.  These were very functional but didn’t look all that nice, and when I wore a pair of boots I would have these curled up magazines lying in my closet.

My idea evolved out of a few sources:
  1. The use of rolled up magazines for boot holders I’ve seen posted on pinterest.
  2. The boot holder my sister-in-law showed me, which was basically a stuffed tube with a loop on top for placing the holders in and out of the boots.
  3. Some examples of boot holders I’ve seen for sale on etsy.com that had the same stuffed tube concept covered by a bag made of fabric and tied at the top.
 
Boot Holders
 
Boot Holder with Rolled Up Magazine
 
The original thought was trying to make boot holders like the example my sister-in-law showed me.  She had noted these were a little too wide of a tube and didn’t fit well in the ankle area of some of her boots.  It made me think – the rolled magazine works well because it can adjust to different size boots – so . . . perhaps the magazine just needed a cute cover – this is when I came up with my creation.  I made bags made out of upholstery fabric to hold the rolled up magazines.  The top is tied with any sort of ribbon.  The gathered area on top gives you something to grab onto when removing the holder.

Boot Holder
 
I like this solution for a number of reasons. (1) It looks better than just a rolled up magazine.  (2) I’m up-cycling some old magazines (3) I’m making use of scrap pieces of fabric I had lying around. (4) I’m also using some leftover ribbon from my ribbon stash.

Please note – I used all upholstery fabric scraps in my holders and I think this type of fabric worked pretty well.  The great thing is that there is not much fabric needed and only a small amount of ribbon so (if you are a sewer like me) it is likely that you may have enough supplies on hand and make these for free.

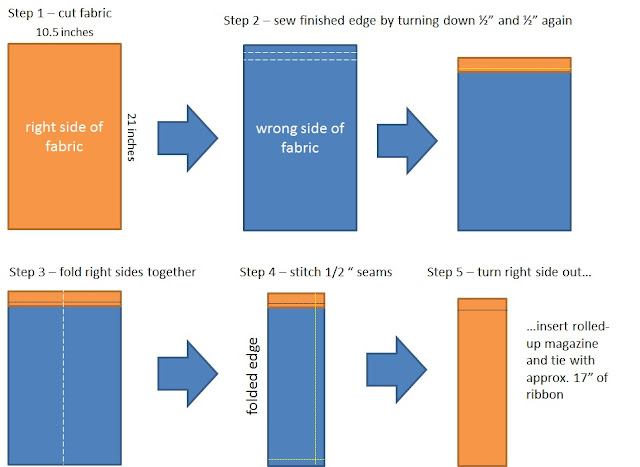
Because this is such a simple pattern and sewing project – I decided just to post the simple instructions instead of a lengthy tutorial.  *Remember you will want to cut and make two of these to make a set  :o)

(You can double-click on the graphic below to see a larger view.)
 

Boot Holder Instructions


Friday, February 8, 2013

ANTIQUE SILVER PAINT FINISH


Antique Silver Paint Finish

This was a project for a friend to refinish a cedar chest.  The corners had been damaged by some furry friends and re-staining wasn’t really an option.  We decided to try an antique paint finish.  The original plan was do have it more “antiqued” looking, but we stayed with the shiny silver paint and went with just antiquing the grooved areas.  The final finish is silver spray paint and the grooves were antiqued with a 50/50 mixture of black and silver acrylic craft paint. 

The corners were repaired with many layers of wood filler. This is what they started out looking like…


I applied layers of wood filler over the course of a week; I would do a couple coats a day, letting each coat dry and then adding another layer, and some sanding to shape the wood filler to the original form of the corners as best as I could. They are not perfect, but here is what I was able to do...


The time consuming part was the prep work.  Building up the corners with wood filler and sanding the whole chest with all of the nooks and crannies, including sanding the inside cedar lining to reactivate it (even though I was not paining this part).


I also added some picture frame molding to the back of the piece to add some interest.


I primed the whole piece with spray primer.


Then I spray painted it silver.

Antique Silver Paint Finish
 

Then the antiquing with an artist brush with the 50/50 black and silver acrylic paint mixture.

Antique Silver Paint Finish
 
Antique Silver Paint Finish
 
Antique Silver Paint Finish


And finally coating it with a satin spray varnish.

Antique Silver Paint Finish
 

Saturday, February 2, 2013

PHOTO WALL REDO

As part of a family room redo for a friend I reworked an existing photo wall.  My friend and her mom made a good attempt at originally setting it up, but we decided to add some non-photo items and adjust it a little bit.  Included here are some general guidelines I followed to come up with the final design.


Let me start by saying there a lot of online examples of photo walls where you can buy particular sizes of frames and go with a pre-set configuration.  This is a great fool-proof way to approach a photo collage.  However, if you already have a bunch of random frames you want to use – here are a few guidelines to help you create your own custom configuration.  I call them “guidelines” and not “rules” because I don’t think they are absolute, but if you have a configuration that feels “off,” they might help you tweak it and make it a little more appealing.


(1) Start with a large piece of paper.  This needs to be at least as large as the estimated space to be taken up by the photo collage on the wall.  Lay the paper on the floor.   You have probably seen this method on design shows or perhaps from purchased photo wall sets that provide a paper template.  (My choice for this method are large pieces of graph paper from an office supply store.  They come in those giant size pads that can go on an easel.    I tape them together for larger configurations.  They make it super easy to keep everything level and allow for easy spacing between frames.)  You will be drawing an outline of the frames onto the paper once your configuration is complete, as well as marking the location of the hanger(s) for each frame.  Last, you will label the outlines of the frames by photo to make hanging a breeze. (Side-note: the large graph paper is also perfect for making patterns for pillow covers.  No measuring required – just count squares and cut!)

Here is the photo of the template we made for the photo wall redo.  This is made up of four giant pieces of graph paper taped together.  Each frame is outlined, labeled and marked exactly where the nail holes need to be.  In addition - for those frames requiring two holes, I used the "tape method" found on the following pin on Pinterest. ( 1-Put a piece of tape on the back of a frame covering both holes.  2-Mark the holes on the tape.  3-Mark the middle of the frame on the tape.  4-Transfer tape onto the paper lining up the center point of the frame outline, with the center point on the tape.)


(2) Begin laying out your photos.  Here are some tips I have found helpful:

a) Distribute photo sizes across the collage for balance.  Start placing your frames out on the floor on top of your large piece of paper.  Keep in mind that you want the overall collage to feel "balanced".  If you put all the large frames on one side, and all small frames on another – it may look lopsided.  In addition, if you put all the large frames on top and the smaller ones on the bottom, it can appear top heavy.  I laid out the large frames first and filled in the smaller and medium frames around them until I was happy with the overall balance of the collage.


b) Make sure the spacing is relatively consistent between frames: not too far apart nor too close together.  In the original collage they were just a little too far apart.  A couple inches for spacing worked out well here.  If they are too far apart, the frames appear too separate and might look more like clutter; rather than a cohesive collage that the eye can focus on.

c) Distribute non photo items within the collage.  If you are using non-photo items like the few examples in this photo wall, I found that a couple things worked here (1) having them evenly distributed within the collage and also (2) having them completely surrounded by photos, I say this because if I set it up to leave one of the non-photo items on the “outskirts” of the collage, it looked sort of “stranded" out there.


d) Avoid having negative space that completely “slices” through your collage.  Here is what I mean – can you draw a line completely through the collage with negative space?  In the original collage there was a couple places where the negative space sliced the collage into sections (see photo below).   Alternatively, in the final product, you can’t draw a straight line through the collage without something stopping it.  An important note – I’ve seen some pretty neat looking photo walls out there that deliberately use negative space as part of the overall photo wall composition, and therefore this guideline wouldn’t apply.  Once again – this a guideline and not a rule.


e) Don’t hang the overall collage too high.  This particular photo wall was kept higher than what design standards might dictate to prevent little ones from getting to it from the sofa.  However, we did bring the height down slightly from the original photo wall. To hang the frames, tape the paper to the wall (verifying that it is level) and nail directly through the paper on the locations you marked for each frame.  You can pull the paper off once all the nails are in place.  Then use your labeled template to help interpret which photos go on which nails.

Here's another photo collage I created using the same general guidelines.  I was very happy to have the paper template as I ended up moving this collage from one room to another - it was so easy to just place the template on the wall in the new room and hammer the nails in.  The moral of that story - save your paper templates :o)
 

Thursday, January 31, 2013

BATHROOM TP STORAGE


Bathroom Powder Room TP Storage
 
If you have a powder room with a pedestal sink, chances are you have this same bathroom dilemma – no storage for spare rolls of TP.  My solution is a small basket that holds just a couple of rolls placed in the corner of the room.  I like this better than just stacking them on the back of the toilet, or heaven forbid – no backup rolls at all!  I also like the idea that guests know exactly where the spare rolls are, rather than having them go through cupboards even if they are available for storage (the same concept is used here in another one of our guest bathrooms)...

TP Storage in Bathroom
 

I took the time to line both of these baskets.  However, please learn from my experience.  The first basket didn’t have clearly defined corners so I don’t think it turned out as nice, despite the time I took to make custom fit liners (the corners are ‘bunched up’ against the basket material on the interior of the corners).  So…look for baskets with corners that are clean and defined like this one...

Fabric Lined Basket

TP Storage Basket
 

A good thing about these types of liners, is they keep the toilet paper rolls from getting ‘snagged’ on the inside of the basket.  They are also an opportunity to add some color.

Here is the step by step on creating one of the liners…
(1) Get a basket that fits a couple of rolls

Basket for TP Storage

(2) Cut out paper templates that perfectly fit the lining of your basket.  (Mine are labeled “old” because they are not the final templates with the seam allowance that I use to cut the fabric pieces)

Creating a Template for a Basket Liner
 
(3) Create new fabric pattern templates (from the original paper templates above) with the appropriate seam allowance – I added ½ inch for the bottom and sides and 1 inch for the top to create a finished edge.

Template with Seam Allowance

(4) Use your new templates with the seam allowance to cut out your fabric pieces.   Cut two pieces for the long sides and two for the short sides.

Cut out pattern pieces

(5) Pin the top of the four side pieces to create the finished edge by turning them down ½ inch and ½ inch again.

Pin Top Edges

(6) Stitch the tops of your four pinned side pieces to create the finished edge you will see at the top of the basket.

Sew finished edge

(7) Pin the bottom piece to one of your long side pieces (right sides together of course) and sew a ½ seam.

Sew Bottom to Side Piece


(8) Do the same with the other side so you end up with something like this…

Both side pieces sewn to bottom


(9) Pin and sew one of the small side pieces to the ends of your liner.  Right sides together and a ½ inch seam.

Sew small sides to liner


(10) Do the same with the remaining small side piece…

Sew small end to liner
 
(11) Do a test fit of the liner inside the basket.  If it’s too big – you can always sew the seams a little wider.  Also, trim the seams especially where the top of the liner meets the corners of the basket.
Test fit the liner to the basket

(12) I started by hot gluing the corners of the liner to the basket first and then ran a bead of glue along the sides.

Glue corners of liner first


NOTE: As I mentioned above, the corners of this basket did not turn out as neat as my other one.  Because the basket started out with a “not-so-clean” corner – the end result with the fabric doesn’t look as nice.  Consider this when choosing a basket (or find an oval or round one so you can avoid the corner issue altogether).

PAINTING VASES


Painting a Vase Before and After
 
This vase was painted to accommodate a family room redecorating project I did for friends.  When we had identified the color pallet for the room, I was concerned it would be tough finding the perfect soft blue/teal accessories that matched the paint color and curtains we found. 

The solution - paint our own.  We already had sample paint ready to go, leftover from the paint selection for the wall.  This enabled me to locate vases of a specific size and shape regardless of color (which made bargain shopping even easier).  The first vase was a smooth plastic (seen here) and the second a sort of textured metal.  I figured both would accept paint quite well with primer as the base.  After sanding each piece, I covered them in spray primer.  I’m not sure if this step was completely necessary, but I typically opt for primer when I’m not sure how a unique material will accept regular paint.  To me, the extra step with primer means I’m better safe than sorry.

Painting a Vase
 
The key to painting these (especially the smooth vase) was the brush I chose.  I have a pretty good set of acrylic brushes and I chose a large, flat and very soft artist brush to give a smooth finish.  Spray painting would have provided a very smooth and even finish, but then I wouldn’t have been able to use the custom color (I would have had to pick from the limited selection of spray paint colors, although I've noticed that Lowe's has quite a few fun colors to choose from).  I'm not necessarily saying everything has to perfectly match when decorating, but this was such an unique color of a pale teal blue - I wanted to get it right.  When painting I was careful to use long even strokes from the base to the top to avoid any brush marks.  Also I did several light coats to keep the finish smooth.  Remember - the right brush will make all the difference in the world here.

Here's the vase in the room on the mantel...
Painted Vase on Mantel
 
 
Here's the other vase I painted in the same manner.  It was made of a metal material so priming this one before painting was a must...

Painted Vase on Media Table
 
 
If you are looking to paint a glazed ceramic vase - see my other post here.