Tuesday, June 17, 2014

SEA CREATURE ART

SEA CREATURE DECOR - Stained Wood and Fabric

These were another fun project for a boy's room for some good friends of mine.  I'm a fan of large pieces of art in a room, and certainly when you can create something unique - all the better.  In my opinion - larger pieces create a more pleasing and clear focal point in a room, as opposed to a lot of small things cluttering up a space.

The fabric was left over from the window valence and pillow I sewed for the same room.  It was this leftover fabric that inspired the wall art.  It was one of those situations - "I have a bunch of this striped fabric, so I must figure out something to do with it".  The pieces were big enough to create something interesting for the wall.   Another source of inspiration came from the wooden school of fish we had already set up on the opposite wall of the room


The fish were stained a dark brown and I felt that carrying that stained look forward with larger wood pieces, and using the fabric as a background would work just fine.   Ultimately, I determined I had enough fabric to do three separate pieces.  See the post for the school of fish here.

Here's the process I went through to create the wall art panels...

THE WOOD CUT-OUTS

I must admit I can't take all the credit for these.  The boy's father (thanks Ryan) took care of cutting out the wood pieces after I provided the paper patterns.  After he cut them out for me, I stained them and put a coat of polyurethane on top. 

SEA CREATURE DECOR - Wood Cut Outs


STAINING THE WOOD CUT-OUTS

I used a gel stain and applied it with an old T-shirt rag.  I always wear plastic gloves when applying stain this way.


Gel Stain


SEA CREATURE DECOR - Staining the Wood
Applying the Gel Stain
 
 
A small artists brush was used to get stain into the crack and crevices I could not reach with the T-shirt rag.


Applying the Gel Stain


I finished off the stained cut-outs with a coat of satin polyurethane.  I like this stuff because it is water based and I think it is easy to work with and easy to clean up.

Clear Coat After Staining

DRILLING HOLES TO ATTACH CUT-OUTS

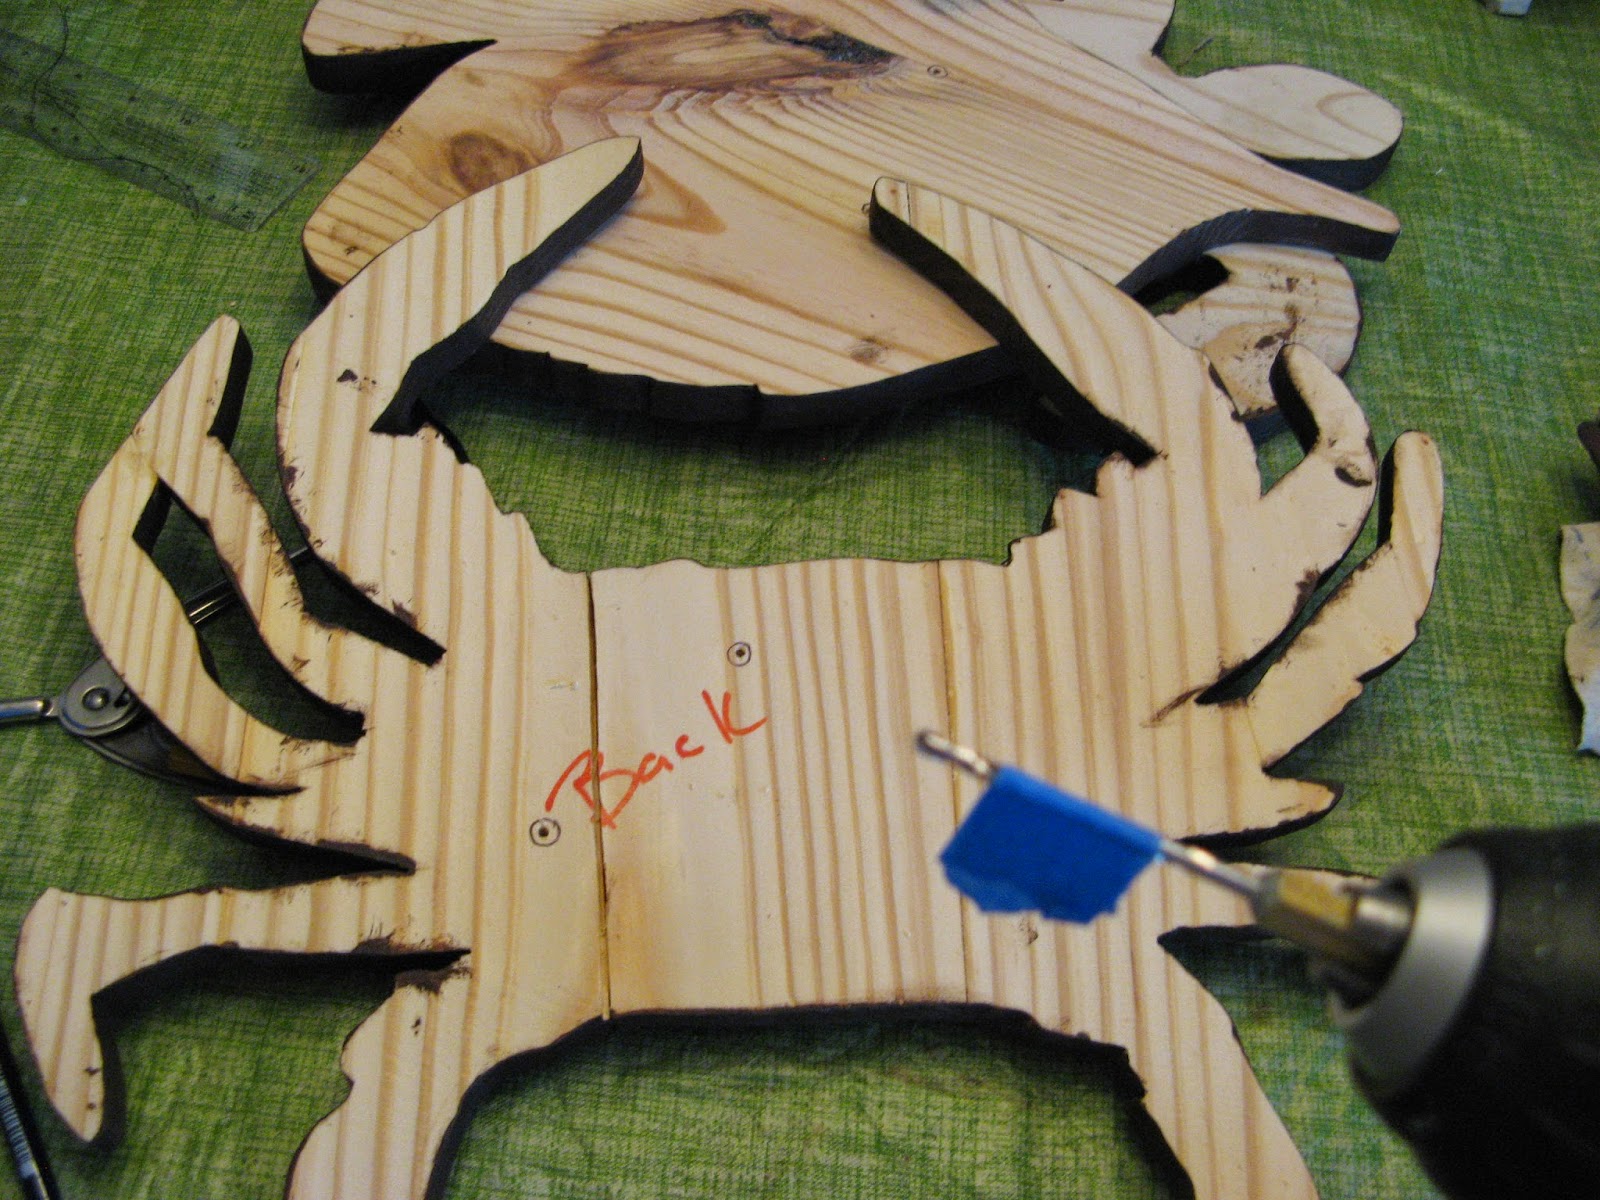
24" squares of MDF were cut out for the base for these pieces.  Our friend had scrap pieces laying around so this is what was used.  The material itself (MDF) is not so important since they would ultimately be covered in fabric.  Before covering the boards in fabric however, I needed to drill some holes that would enable the cut-outs to be attached to the boards.  I thought about this for awhile because I wanted all the holes pre-drilled.  Here is what I did: 

(1)  I placed the wood cut-outs on the square boards and determined the exact placement.
(2)  I traced around the cutouts onto the board.
(3)  I removed the cut-outs and marked where I wanted the holes to go for the screws that would hold the cut-outs in place.    I chose to do 3-4 holes on each piece.
(4)  I drilled the holes all the way through the boards. 
(5)  Next, I held the cutouts in place on the boards (using where I had traced around them previously as a reference for placement).
(6)  Then I took the pointy part of a compass and pushed it through the back of the board (through the holes) to make marks where the corresponding holes would go on the cut-outs.  You can see in the photo below where the points I marked with the compass have circles drawn around them with a pen.


(7)  Last, I drilled pilot holes into the back of the cutouts.  I was very careful to not drill too deep, and used masking tape on the drill bit to make sure I would not drill to far (see tape on drill bit in photo below).


The holes I drilled will be important for later.  Next I had to cover the boards in fabric...


COVERING BOARDS IN FABRIC

It was easy to cover the square boards with fabric.  All I had to do was staple the fabric to the back, starting with the sides first, leaving the top and bottom undone.


The fabric was on the heavier side so making the corners neat took some planning.  I stapled all the way to the edge of the corner...


Then I folded the corner in (much like wrapping a present, and stapled it...


  Then I folded the second flap up, and stapled it...


After all four corners were done, I stapled the rest (the middle) of the top and bottom sides...


Then I trimmed the excess fabric...


HANGING HARDWARE

I paid particular attention to the hanging mechanism on the back since these are a little on the heavy side.  I used metal hangers screwed in to the back of the particle board, with picture hanging wire to be used across the middle connecting the hangers.


Remember those holes I had drilled earlier? (In both the boards an part-way through the stained cut-outs?) That is how I attached the cut-outs to the boards.  I pushed the screws through the back of the panels, and through the fabric, and then matched them up with the holes on the back of the stained cut-outs.  Lastly, I just had to tighten down the screws to attach the -to the boards.
 
Here are the finished products after the stained wood cut-outs were attached...
 
SEA CREATURE DECOR - Stained Wood and Fabric

SEA CREATURE DECOR - Stained Wood and Fabric

SEA CREATURE DECOR - Stained Wood and Fabric

SEA CREATURE DECOR - Stained Wood and Fabric


Friday, June 13, 2014

SCHOOL OF FISH

School of Fish - Stained Wood
 
School of Fish - Stained Wood
 
The under the sea theme for a friends boy's room inspired this project.  We had created a really fun wall art piece for their little girl's room (See FLOWER WALL ART post), which turned out super cute.  It was a collaborative project between Heather and I, and I think it turned out exceptionally well.  Now I was tasked to create something just as fun and interesting for the boy's room.

I did some searching online for ideas and I kept seeing the wall decal schools of fish.  I thought these were cool, but the decals seemed a little too ordinary as I've seen decals used a lot these days.

http://stickerbrand.com/products/vinyl-wall-decal-sticker-school-of-fish-os_mb629

Fortunately, Heather's husband has a lot of wood working tools and cutting the fish out of wood (as opposed to decals) was a great option (especially since I didn't have to do any of the cutting or sanding).  The fish were stained with a gel stain.  I have found that gel stain is fairly easy to work with (applied with an old t-shirt rag) and then top coated with a satin clear coat.   I was told that gel stain works well for woods that my not take the stain particularly well, which was a concern with the wood that was used.  The gel stain worked out just fine for this project.

In order to get a well planned grouping on the wall, I created a paper template for hanging the fish.  It enabled me to figure out a grouping and make it easy for us to locate an ideal spot on the wall and hang the fish.  I outlined the fish and holes were cut out of the middle of each one on the template to place the 3M hangers.  The template worked out particularly well for us because we painted the wall blue after installing the fish the first time.  It was great to have the template available for re-hanging the fish.

School of Fish - Stained Wood (Template)
 
School of Fish - Stained Wood (3M Hangers)
 
School of Fish - Stained Wood (Template)


Hanging them ...  The 3M hangers were a good idea.  They adhered to the wall nicely, but for some reason, they were not holding on to the back of some of the fish.  We ended up having to superglue some of the hangers on the fish.  As far as I know they are all still holding up at this point.

Update 6-13-2014

Here is a final photo of the room.  I think the blue wall is a great compliment to the stained wood fish.  The orange lamp also got a facelift with the rope lamp shade, another fun DIY project.  See that post here.

School of Fish - Stained Wood (Blue Painted Wall)
 
 
Also, check out the wall art pieces we created for the opposite wall in the same room (see link here)


Wednesday, June 4, 2014

DIY STONE LANDSCAPE BORDER 2


DIY Stacked Stone Landscape Border


One of my latest landscaping projects was to do a stacked stone border around the trees in our front yard.  We had already completed a border on the trees in the backyard (see post here), but wanted to try something different.

My husband and I both liked the idea of a natural stone dry stack.  I was concerned about the stability of this type of border. The solution was to "back-mortar" the stack after it was completed - providing stability but still keeping the look of a dry stack in the front.  But that is jumping ahead a bit.  Here are the supplies I used and the process I followed...

SUPPLIES
  • Natural Stones - when using natural stone for a dry stack - it is much easier to use flatter stones.  Keep this in mind when searching for stones.
  • Shovel - for digging the trench
  • Level - to check the stack for level as you build it.
  • String Level and String - to check the stack for level.
  • Sand - to provide a more stable base.  (I used about one bag per tree)
  • Rubber Mallet - to tap the rocks in place and correct for level.
  • Mortar - I used masonry mix from Lowe's. (see photo below)
  • Two Large Buckets - to mix mortar.
  • Drill - corded drill to mix mortar.
  • Mixing Attachment for Drill - to mix mortar.
  • Dust Mask - to wear while mixing mortar.
  • Rubber Gloves - to wear while mixing and applying mortar.
  • Trowel - to apply mortar to back of stack.
  • Hose and Sprayer - for adding water to mortar mix and to mist the mortar occasionally as it dries so it does not cure too fast and crack.
  • Newspaper - To use as landscaping cloth to prevent weed growth
  • Mulch - to cover the base of the tree.

DIGGING A TRENCH

Start by determining the size of the bed around the tree.  We chose to do just a simple small circle.  Cut the sod and dig a small trench around the perimeter.  Note - there is a reason you dig a trench rather than just setting the stack on top of grass - the trench will allow the stack to block the grass from growing into the mulched area around the tree.


DIY Stacked Stone Landscape Border - digging around the tree

DIY Stacked Stone Landscape Border - Digging around the tree

 
LAYING THE STONES
 
The key to this whole process is starting with a level base.  If you don't start with a level base - these types of borders end up looking sloppy.  I used a basic level to determine if the stones were laying flat.  On dirt, this is not a perfect science but atleast it gives you a general idea. Using a level on top of natural stone with it's inconsistent surface seems kind of silly, however, I used it to make sure I was generally keeping the stack level. 

TIP - Keep in mind that these are natural stones and not perfectly shaped bricks.  When attempting to level the base, you will find your measurements with the level can be inconsistent in a single stone with the variations on the surface.  No worries - just do your best with leveling and move on.

DIY Stacked Stone Landscape Border - keeping it level
 
TIP - Sort through your stones before starting and you may find you have some with a side that is not so flat - you can use these on the base and bury the not-so-flat part in the ground.  This saves the flatter more ideal shaped stones for your project for the rest of the dry stack.

Fit the first stone into the trench at the lowest point.  Remove the stone and add some sand.  Replace the stone and use the rubber mallet to tap it and set it in the place.  Check that the stone is level using the hand level (both left-to-right, and front-to-back).  Tap the stone with the rubber mallet to level it if necessary.

Place the second stone next to the first in the trench.  As you place stones you may find you have to dig a little more dirt out to keep the stones level with the previous ones.  Remove the stone and add some sand.  Replace the stone and use the rubber mallet and tap it in place.  Check the stone for level against the previous stone and make adjustments where necessary (by tapping with the rubber mallet or adding sand if necessary).  Continue this process around the tree.

TIP - Choose stones of similar thickness as you start stacking.  I start each layer with medium thick stones and then stand back and review my work. If there is a "dip" in a layer, I can replace a few stones with thicker ones.  If there is a "bump" in a layer - I can replace a few stones with thinner ones.

TIP - As you move forward and check the stack for level - a string level can be helpful as well.  I didn't find using the string level so useful when the stack was short.  I used one at the end to re-check the stack. 

As I mentioned earlier, I started to set the base at the lowest point around the tree as our yard was slightly sloped (as most yards will be).  As you place subsequent stones, and the land is sloping upward, you will find you need to create a stair-step.  As I moved around the tree, I would stair-step my way up.  NOTE:  Make sure you have the same number of "steps" on either side so that when you start stacking you have equal levels on either side (In other words, you don't want to create a spiral of stones).  I made this mistake on the second tree because I was not paying attention, and had to go back and re-work a step into on one of the sides.

DIY Stacked Stone Landscape Border - stair stepping

DIY Stacked Stone Landscape Border - stair stepping
 

When you complete the stack, this is what you should end up with (see below).  Notice I have not yet pushed the dirt back against the stones.  I still need to mortar the back of the stack to provide some support.

DIY Stacked Stone Landscape Border

DIY Stacked Stone Landscape Border - before mortar is applied

DIY Stacked Stone Landscape Border - before mortar is applied

DIY Stacked Stone Landscape Border

 
I did a final check with a string level to see if I was still on the right track with the keeping the stack level.  A few adjustments were necessary.  Once I was happy with the stack, it was time to "back-mortar" it.  Here is how I went about mixing the mortar. 

MIXING THE MORTAR

Drill and Mixing Attachment

Mortar

Supplies to mix mortar

Use the second bucket filled with water to hold the drill and attachment and keep it clean between mixing.

Mix some mortar in a bucket (follow the directions on the bag).  You want to mix small amounts, apply, and remix more mortar as you go.  Use a trowel to apply the mortar to the back of the stack. 

In addition to applying mortar to the back side, I picked up the stones on the top row of the stack and applied some mortar underneath each stone for some added stability.  Make sure you are not letting mortar seep to the front of the stack when doing this.  By using this method, all the mortar is hidden underneath the top stones and behind the stack (which will be covered by dirt and mulch), and therefore, you still have the look of a dry stack in front.

TIP - As I am working, and every so often, I go back and mist the mortar I have already applied (with water) so it doesn't cure too fast and crack.  A slower cure for materials such as this will result in a stronger structure.  Be sure to just mist the mortar (I have a "mist" setting on my hose sprayer), don't blast it with a hose and wash it away!

DIY Stacked Stone Landscape Border - applying the mortar

DIY Stacked Stone Landscape Border - applying the mortar


LAYING DOWN MULCH

DIY Stacked Stone Landscape Border - newsprint as landscaping cloth


Once the mortar is dry, you can push the dirt back behind the stack.  Before placing the mulch back on the dirt under the trees, I laid down sheets of newsprint for weed control.  All the dirt was covered in at least 3-4 layers (a couple layers is not enough).  I found that misting the layers with a hose helped these from blowing around as I was laying them down.  Then I covered them with mulch.  The newsprint has worked out wonderfully in preventing the growth of weeds or grass.  I understand that over the years this will break down and have to be replaced but that's OK with me.  I know you can use landscaping cloth, but recycling the old newspaper for something useful seemed like a great thing to me.

I think the finished products turned out great and best of all - no more pulling grass out of the mulch around our trees!


For my other natural stone border see this post: DIY STONE LANDSCAPE BORDER 1

Tuesday, June 3, 2014

BANISTER - PAINTED WHITE SPINDLES

BANISTER - PAINTED WHITE SPINDLES
 
Painting this banister represents a happy ending to my most challenging decorating issue in our beach cottage.  The dark espresso brown stained cabinetry in the kitchen and the dark stained banister did not fit in my vision of a "Florida Beach Cottage".  The house already had the white cottage style trim around the windows, and the bead-board wainscoting which seemed to easily convey a coastal feel, but the dark brown - not so much.

I'm a big advocate of embracing the elements you have a tough time changing.  In this case, the brown cabinetry in the kitchen was staying along with the banister - there's no way my husband would have allowed me to paint the cabinets to completely change them.  So...there was no choice but to embrace these elements. 


Dark Stained Kitchen Cabinets - Beach Cottage
Dark stained kitchen cabinets
 
In order to balance out the great room with the giant brown bank of kitchen cabinets in one corner - we went with the woven wood dark brown blinds on the windows.  I think this helped integrate the dark brown color with the overall style of the space (rather than having  the kitchen just stick out).  In addition, we added some furniture pieces with a similar dark finish (the cedar chest at end of the dining room holding all our beach towels, and the media table in the family room purchased as a base for the flat screen TV (see photo below).

Dark Brown Woven Wood Blinds
 
Dark Stained Cedar Chest in Dining Room
 
Dark stained media table...
....I added these weathered aqua blue knobs for a more "beachy" look.

I initially thought the dark brown banister was going to help carry the color through the space and create good flow with the "not-my-first-choice" color.  However, I just never liked the starkness of it, especially when walking in the front door.  Nonetheless, it went with the cabinetry so I didn't feel I had a choice, and it didn't initially dawn on me to change it in any way.


Then I came across some photos of banisters with dark brown railings but the spindles were painted white.  These clearly had a more "cottage-feel" to me.   Here is one of the examples...

Example of banister with painted white spindles.

Next step, convincing my husband to let me do some painting.  I knew this would be tough since he's not a fan of painting any stained wood.  I must have caught him in a moment of weakness because he eventually conceded to let me try it. I'm so glad I got the chance.

This is a great example of the amazing power of paint.  To me, I think this simple change was very high impact.  I say simple because it was so low cost.  We already had the paint for touch up of trim in the house, and we had primer left over from other projects.  The only other supplies necessary were some sandpaper and some painters tape.  In the end, the change cost us virtually nothing.

The not-so-simple part was the labor involved - taping off each spindle, sanding (twice - first with 80 grit, then with 120 grit), wiping them down, 2 coats of primer, and 2 coats of paint.  (I probably should have done some light sanding between coats of paint, but I was running out of time and wanted to get the project finished).  The painting was done with a large soft artist's brush - the only way to go in my opinion unless you have the opportunity to spray them.  The whole process took a full day of my time.

BANISTER -  PAINTED WHITE SPINDLES BEACH COTTAGE

Overall, I love the banister now.  In addition to fitting in more with the cottage style, it combines the colors of dark brown and white into a single element, thus making this combination work even better elsewhere in the room.  For example: the dark brown woven blinds in the white trimmed windows; the dark brown cabinets and the white subway tile backsplash (coming soon!).  Also, we notice the amount of detail in the spindles that wasn't as apparent to us when they were stained dark.  This seems to add even more to the cottage character of the room.

My only regret - why did it take me so long to figure this out?

Update 10/2014 - Check out the latest piece of art I created for the stairway wall.  I was inspired to do something with that wall after the spindles were painted. (Perhaps I had been avoiding it because I really disliked that brown banister and didn't want to draw any more attention to it by placing something on the wall behind it).  The piece was created from an old painted pallet and a photograph printed on metal (from Shutterfly).  See post here for more on that project.


For more beach cottage posts see my Beach Cottage page.