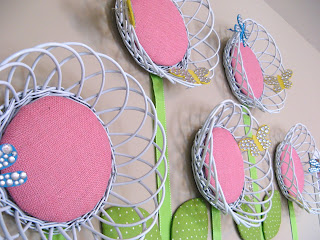
These were made for my friend Heather’s little girl’s room. She's the one who lets me play ‘decorator’ every once in a
while. This project came about quite by a
mistake. We had originally bought these
baskets for another purpose for their home, but as I stared at them on the
floor, I was taken aback by how much they resembled flowers. I am very lucky to have a friend who lets me run with my crazy ideas!
This was an ‘on the fly’ project - we just made it up as we
went along. I love these types of
projects and the collaboration with friends to come up with unique ideas and
solutions. My friend Heather doesn’t
give herself enough credit on this one – she chose the leaf shape from the
options I gave her, as well as the ultimate layout of the flowers and the stems. Here
is an explanation of the individual components…
(1)
Wooden dragon fly (and butterflies) painted and ‘bedazzled’
with faux gems.
(2)
Green Grosgrain Ribbon.
(3)
Cardboard leaves covered in quilt batting and cotton
fabric.
(4)
Cardboard circles covered in quilt batting and pink
burlap.
(5)
Baskets spray painted high gloss white.
Here are the supplies and steps we took to make them...
What you need
·
Baskets resembling flowers (we bought ours at
Old Time Pottery)
·
Spray primer
·
White high gloss spray paint
·
Hot Glue Gun
·
Corrugated Cardboard (old boxes are fine) - enough
for circles within flowers, and leave shapes
·
Fabric – enough to cover circles and leave
shapes (we used pink burlap for the circles and a green and white dotted cotton
for the leaves).
·
Quilt Batting – enough to put 2-3 layers between
fabric and cardboard for circles and leaves
·
Grosgrain Ribbon – for stems
·
Nails to hang baskets and adhesive to apply
leaves to wall (we used packing tape and it’s still holding strong). 3M might have some other options.
·
Wooden
dragon flies and butterflies and faux gems.
Both were purchased a Hobby Lobby.
·
Acrylic paint for dragon flies and butterflies
Steps
(1)
Spray the baskets with primer.
(2)
Spray the baskets with white high gloss paint
(3)
Cut out cardboard circles to fit inside the
baskets.
(4)
Cut circles of the same size out of quilt
batting (2 or 3 layers is good for each piece of cardboard), and lightly hot
glue to cardboard pieces.
(5)
Cut fabric circles about 2” larger than the
circumference of the cardboard pieces and wrap them around the cardboard and
batting, securing with hot glue on the back side.
(6)
Repeat steps 3-5 for the leaves.
(7)
Cut the ribbon for the stems and hot glue the
top of the ribbon stems to the back of the baskets.
(8)
Hang the baskets with nails. Adhere the stem to
the wall with adhesive if necessary (ours hung behind the bookcase so it was
not necessary). Adhere the leaves to the
wall with adhesive.
(9)
Paint and bedazzle dragon flies and butterflies. Hot glue twist ties to back of each to attach
to basket.


No comments:
Post a Comment