Wednesday, August 12, 2015

DIY ROPE CHANDELIER

DIY Rope Chandelier


There are a number of posts out there about how to go about making these types of wrapped rope chandeliers.  I have read quite a few and I have accumulated some of the tips I found, along with my own tips right here:


Let me start by saying that my chandelier was a little different than many of the ones I have seen out there. It had a wider central base to wrap the rope around (I am referring to the faux crystal part of the chandelier).  Many examples I found online of a rope wrapped chandelier were made of all very narrow connected pieces.  Because of the wider base - I chose to use a wider diameter rope.  This created an issue for me - I didn't like the idea of the "spiral affect" I would get if I took a single piece of rope and wound it down the base. 


I realized in order to keep the rope horizontal - I had to piece each section as I moved down the lamp.  In other words - each layer is an individual piece of rope.  To do this.  Each row of rope had to be custom fit and the ends carefully pieced together to avoid the obvious look of seams.
  I did the ends of the arms first (the "cups" that hold the light bulbs and I have to admit - I did not do a neat-and-tidy job of piecing the rope).

DIY Rope Chandelier


As I moved forward, I worked harder cutting & piecing the rope (by cutting the ends at an angle) and I got pretty good at disguising the seems on the base of the lamp.  It definitely takes some time to do this right.  I go into more detail on this below in STEP 4.


PROCESS

SUPPLIES

Brass Chandelier - Habitat for Humanity Restore $15


Spray Primer and Satin Brown Spray Paint - $9
Fifty Feet of 3/8 Inch Sisal Rope - $8 per roll (one roll), I found mine at Lowe's
Light Bulbs - package of six candle style - $6


Small Wooden Ball - free (from my craft stash).  This was used as a sort of finial on the bottom of the chandelier.


Multi-meter - borrowed from a friend to test the wiring

Hot Glue Gun & Lots of Hot Glue Sticks - (from my craft stash).  Funny story about the hot glue sticks - about 20 years ago, I ordered a box of glue sticks from a craft store.  I had not paid attention to the size of the box, or the number of glue sticks it included;  I was just sick of running to the craft store to buy 10 glue sticks at a time for a dollar.  In the end - I was the proud owner of a GIANT box of glue sticks.  Over the years, I have handed out baggies full of glue sticks to friends and family, and I still have half a shoe box full of glue sticks.  For this project I used quite a bit of hot glue.

TOTAL  SPENT ON CHANDELIER- $38

STEP 1: TEST THE WIRING

I used a multi-meter borrowed from a friend to test the wiring.  I mean - my husband used our friend's multi-meter to test the wiring (he's an electrical engineer so I think it is technically his job to do that kind of stuff for me :o)  If you are utilizing a thrift store chandelier like I did - this is an important step. I would hate to go through this whole process, only to determine the wiring doesn't work.

STEP 2: PREP THE BASE

Tape off areas of the lamp you do not want to paint.  For me this included the wire up the chain, the exposed wiring at the top of the lamp, and the areas where the bulbs are placed.


I chose to spray paint the base a dark brown. Some will suggest  painting it an identical color of the rope you are using.  I went with a dark brown with my natural color rope, as I decided this is the color I wanted for certain parts of the exposed base.  In my opinion - the importance is to have a base that is a consistent color and if any of the based is going to be exposed - make it that color.


I highly recommend hanging the chandelier when you paint it.  It will save you time and aggravation when painting (no painting in sections and worrying about letting it dry and turning it over).  Also, another important tip - don't use the entire can of spray paint.  Make sure you have some leftover for touch ups after you finish wrapping the rope.

STEP 3: CHOOSE YOUR ADHESIVE

In my opinion, hot glue is the way to go.  You can use other types of adhesives but will definitely need to use clothespins (or something like them) to hold the rope while the glue dries.  I like to use hot glue because you can easily glue as you go with each wrap of rope and it holds rather quickly (never mind the burnt fingers - it just comes with the territory).   I had clothespins on hand but I didn't use them a whole lot.

As far as how to use the glue - I really think it is important to glue as you go to avoid noticeable gaps.  The idea of gluing one end and wrapping large areas to only glue again at the other end is a nice idea, but I'm skeptical this would yield good results.

STEP 4: START WRAPPING

All chandeliers are different - you need to plan out a strategy of how each section is wrapped and pay particular attention to the transitions from one part to another.  Remember - the rule is no gaps.  I also had to pay attention to the idea that some parts would be hard to get to, so I did those sections first.

Choose your rope and start wrapping.  I have seen it suggested to use 1/4 inch rope for some of these projects.  As I mentioned above, I elected to use 3/8 inch three-strand sisal rope.  However - I found the arms of my chandelier were too narrow and made it impossible to use the wide 3/8 inch rope here.  It was necessary to unravel this rope and use a single strand on the arms. 

I think this strategy (of using the smaller unraveled strands on the arms) adds interest and texture, and probably saved me a few bucks in rope as well.  In summary, everything but the narrow arms were wrapped in the wide 3/8 in rope.  Only the five narrow arms were wrapped in the smaller unraveled strands.

DIY Rope Chandelier


Now let's talk about cutting and piecing the rope to disguise the seams.  On the ends of the arms (the cups that hold the bulbs) you can see the start and stop of the ends of the rope.  I had not taken the time to figure out the technique of hiding the seams (where the ends of the rope met on each row).

DIY Rope Chandelier


As I progressed on the lamp - I got better at this.  You can hardly find where the ends of the rope start and stop.  I recommend practicing making rings of rope where you figure out how to cut the rope, seals the ends with glue, and ultimately piece them together.


DIY Rope Chandelier
Cut the ends at an angle and apply hot glue to the ends to keep them from fraying 


DIY Rope Chandelier
Once you put them together, they should be hard to distinguish between the continuous sections of rope.


DIY Rope Chandelier
I'm pointing to the pieced section of rope.  I think  I got pretty good at making these almost undetectable.


Think strategically when you are wrapping your rope.  For the main base of the chandelier, I worked from the top-down to the middle, and then from the bottom-up to the middle.  Had I tried to continue all the way down from the top, I would have gotten to a point where it was almost impossible the get the rope in place around where the arms meet the base.  Think ahead and avoid these types of issues.

When I got to the middle of the base, I had a small gap that was too small for another piece of rope, but no worries - I just glued the last piece somewhat on top of this section and I think this added a little more character to the chandelier - creating a small ridge in the base.

DIY Rope Chandelier

DIY Rope Chandelier


In the photo below - this was all the rope I had leftover from the chandelier.  Yikes! I didn't plan to cut it that close!


SOME HELPFUL TIPS:

- Keep in mind, whether you are piecing strands of rope to create layers or wrapping a single strand - you still want to make sure you are avoiding large gaps between the rope.

- As most posts will indicate - wrapping the rope properly takes hours. Give yourself plenty of time.


STEP 5: FINISHING TOUCHES

If you are using sisal rope - your chandelier will be in need of a hair cut when you finish.  It takes some time to trim all the scraggly ends, but I think it is worth it.  Otherwise, the chandelier looks a little messy.

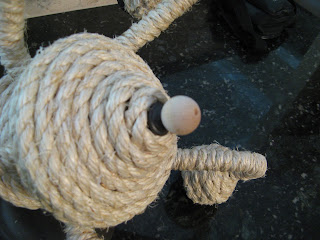
I was having trouble figuring out what to do with the bottom of the chandelier.  I tried to make a "monkey ball' out of the leftover rope and I found it quite difficult with this rope.  So...I ended up using a small wooden ball.  This is actually a wooden bead.   I had to fill in the hole on one side with wood filler, and make the hole bigger on the other side to fit over the existing finial on the bottom of the lamp.  Then I spray painted it a dark brown.  I think it worked out well.  Here are some photos of fitting this bead on the chandelier.


DIY Rope Chandelier

DIY Rope Chandelier


Here is the chandelier in one of the guest bedrooms in our cottage.  I think it really adds character to the room.  Now I have to find another chandelier for the other guest room...

DIY Rope Chandelier - finished product


DIY Rope Chandelier - finished product
 
For more beach cottage posts see my Beach Cottage page.

Saturday, May 30, 2015

LEMON YOGURT PARFAIT


I'm kind of proud of this yummy treat.  Let me start by saying I definitely am not much of a fan of plain greek yogurt, but if I add all these yummy ingredients - this is one of my favorite breakfasts.  I stumbled on to adding lemon zest when it was winter time and I had no fresh fruit to put on top of my plain greek yogurt.  I am familiar with using lemon zest in recipes; I know that the zest (and not the juice) is what provides that great lemon flavor.  I find the zest from 1/2 to a whole lemon works out well here.

The bonus here is you end up with flavored yogurt that is a natural flavor and doesn't include the who knows what ingredients that you find in flavored yogurt at the grocery store.  Furthermore, even if you want to add fresh berries or other fresh fruit on top - the lemon flavor compliments just about everything.

INGREDIENTS

Nonfat Plain Greek Yogurt - Stoneyfield Organic
Lemon Zest - from an organic lemon
Granola - Organic
Organic Sugar
Organic Berries (Strawberries, Blueberries, Raspberries, etc...)
Chia Seeds

***Note #1 - Sometimes I don't have any fresh berries on hand, and I have found the lemon zest adds just enough flavor.  Just plain greek yogurt, granola and lemon zest - Mmmmmmmm.

***Note #2 - I don't measure anything here so I haven't provided any indication for specific amount.  Just add the ingredients based on your personal preference.

Here is what I do:

(1) Put yogurt in a dish

Greek Yogurt


(2) Use a zester or a fine cheese grater to sprinkle lemon zest on top of yogurt.  This may look like a lot of lemon zest but the flavor is amazing. What is pictured here is the zest of a whole lemon.

Lemon Zest


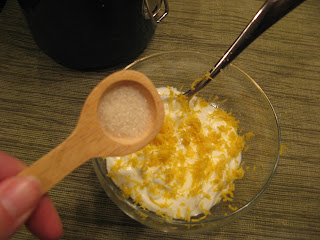
(3) Sprinkle just a little bit of sugar. If you are using a sweeter already flavored yogurt - you probably want to skip the sugar as your yogurt is probably sweet enough already.

Just a little sugar.


(4) Add granola. I add enough to cover the yogurt in my bowl.  I keep some granola in a Tupperware with a plastic spoon so I an easily spoon it on to my yogurt.

Granola


(5) Add berries.  My favorites are raspberries, but blueberries, blackberries and strawberries are all good options.  No berries?  Just the lemon zest provides a good amount of flavor.  Try it without the berries and I think you will be surprised.


(6) Sprinkle Chia Seeds.  These are really good for you.  I try to sprinkle them on anything I can - salads, yogurt, oatmeal...


.

One more tip - don't let this sit around too long as the granola will get soggy as it sits in the yogurt.


Tuesday, May 26, 2015

WOOD FISH WALL ART


WOOD FISH WALL ART
 

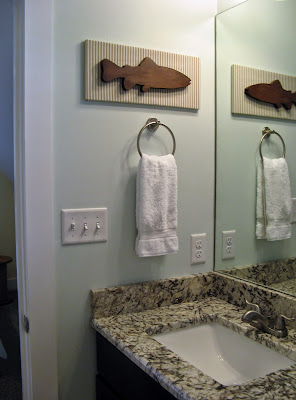
This was one of my "leftover" projects.  This means that all the materials were leftover from previous projects I had worked on.  These are my favorite types of projects because it means they are FREE!!!  Here's the piece of art in it's spot in one of the guest rooms at our cottage.  I painted the walls a pale aqua (this is actually a 50% mix of Tidewater by Sherwin Williams #6477).

WOOD FISH WALL ART
 
The beige ticking stripe fabric works well with the shower curtain (also beige) and provides a good contrast for the dark stained fish cut-out.  The overall neutral color of this piece stands out nicely on the aqua blue painted walls.
 
Beige Shower Curtain in Bathroom
 

LIST OF SUPPLIES


  • Wood fish cutout - The wooden cutout was a prototype made by a friend as we were figuring out a plan for this school of fish wall art project. See photo of that finished project below:
Wooden School of Fish Project see link:
SCHOOL OF FISH
  • The prototype wood fish ended up being slightly larger and a cut out of a thicker piece of wood than the fish we used in the final project above.  So...this fish didn't get used.  All I had to do was stain it.
 
WOOD FISH WALL ART
Wood fish Cutout

  • Stain - The stain was also leftover from the school of fish wall art project.  I wear latex gloves when applying this stain.  I used an old sock to apply the stain to the wood fish.  In addition, I used a small paint brush to get the stain into some of the crevices.  To finish the fish after staining, I had an almost empty can of spray satin polyurethane - just enough to coat the fish.
Gel Stain

  • MDF (Medium Density Fiberboard) - Any solid piece of wood or material will do as the base for this type of project.  As long as it is solid - the material does not matter as it will ultimately be covered with fabric.  The piece I used was an extra piece of MDF from the corner shelves project now in progress.  (That post coming soon.). 

  • 2 Screws - The screws are necessary to ultimately attach the wood fish to the fabric covered panel (from the back).  The screws needed to be long enough to go through the MDF, and then halfway through the depth of the fish.  I found a couple in my miscellaneous screws jar.  Here is the process I went through to prepare the base and the fish:
    • NOTE - All this should be done prior to covering the piece of MDF in fabric.  You will not attach the fish until you have covered the MDF base in fabric.
      1. I placed the fish on the MDF base and I outlined the location of the fish. 
      2. I removed the fish and I chose two spots on the MDF to drill the holes for the screws.
      3. Next step - drill the holes in the MDF.
      4. I held the fish in place on the MDF base again, and used a sharp pencil to poke through the holes of the MDF and mark the placement of the holes on the fish.
      5. I then drilled pilot holes on the back of the fish (at the points I just marked) being careful to only drill halfway through the depth of the fish.    You can put masking tape on the drill bit to mark the depth you need to help prevent drilling too deep.
      6. Don't attach the fish yet - you will do this after the MDF is covered in fabric.

  • Fabric - This was beige ticking stripe fabric was leftover from the pillow shams I made for the aqua bedroom at the cottage.  The fabric was adhered to the piece of MDF with a staple gun (by wrapping the fabric around to the back and stapling).  Pay particular attention to the corners and make these as neat as possible.  Once the fabric was in place - I attached the fish by using two screws going in from the back through the pre-drilled holes in the MDF, and into the pre-drilled pilot holes on the fish.
The fabric used was leftover from the pillow shams from this guest bedroom.


WOOD FISH WALL ART
Final piece in it's place in the guest bathroom


This project makes me take a second look at the rest of my leftover supplies and get the creative wheels turning to see what I can come up with. . . hmmmm. . . .

Here are similar pieces I made earlier for a friend's little boy's room.  See photos below and links to those posts.

SCHOOL OF FISH
 
 
SEA CREATURE ART

For more beach cottage posts see my Beach Cottage page.

Sunday, May 24, 2015

FLOOR LAMP UPCYCLE

FLOOR LAMP UPCYCLE - SPRAY PAINT

My mom suggested a floor lamp would be a nice addition in our bonus room in the cottage.  This made sense to accommodate a nice reading spot.  However, I was not looking forward to purchasing a floor lamp at retail prices.  I could get a cheap one for around $70. . . but then it would be "a cheap lamp".  I could spend a $200 or more on a better quality lamp. . . . but then I would be spending $200+.  The next option was to keep an eye out at local thrift stores and Craig's List.  Ideally I was picturing a white lamp base to go with our cottage style décor.

My patience paid off, as I found this one for $25 on Craig's List.  It was in working order (the wiring was good), it came with the harp, a compact fluorescent bulb, and a rather dated lamp shade.  I liked that it was a substantial and sturdy lamp.  Never mind that the base started to fall apart when we were putting it in the car right after purchasing it.  No worries, some duct tape and glue fixed that with minimal effort - easy-peasy, and I must point out once again. . . . $25.

FLOOR LAMP UPCYCLE - SPRAY PAINT
Floor Lamp - BEFORE


My plan is to donate the lamp shade and get a slight tax deduction.  I had a couple extra lamp shades at home that I thought would work in it's place.   So after some swapping around shades on lamps in our home - I chose this wicker one for my "new" lamp. It's from Pottery Barn.  I had purchased it a while back because it was 50% off so I got it for about $25.00. 

Lamp Shade

The wicker casts a strange light as you can see through the spaces in the shade to the hardware, so my solution was to line the shade with crinkled craft paper. (NOTE: this is not the heavy craft paper but the lightweight gift-wrap weight of paper).  It worked well to mitigate the strange lighting affect.

Wicker lamp shade lined with craft paper.

Because I knew I wanted a white lamp - I needed a can of primer and a can of white high-gloss spray paint.  Luckily, I had enough of a can of white primer leftover from other projects and an unused can of white high gloss spray paint (not sure why I had that one).  Score!  No need to spend money on the paint!  I decided not to sand the lamp before painting since I was going to use primer and the existing finish on it was not overly glossy.  (I hope I don't regret skipping this step later.)  I plan to be careful when transporting the lamp down to the cottage.  It will probably be a good idea to let the paint cure a good long while before moving it to help avoid scratches.

FLOOR LAMP UPCYCLE - SPRAY PAINT
Floor Lamp - AFTER


So - the grand total for a new floor lamp was - $25!  (If I had to buy a shade and a couple cans of primer/paint I would likely have had to spend another $25 or so).  The moral of this story - thrift store and Craig's List finds can be up-cycled with just a little effort.  I often tell people - imagine what a piece will look like if it was simply repainted a high gloss black or high gloss white.  Some really outdated pieces can be transformed with this simple change.

Here's the lamp in it's final spot in the bonus room at the cottage... (I think it works nicely with the white trim; and relates well with the rope boat oar hangers and the light brown stripe in the pillows)


For more beach cottage posts see my Beach Cottage page.