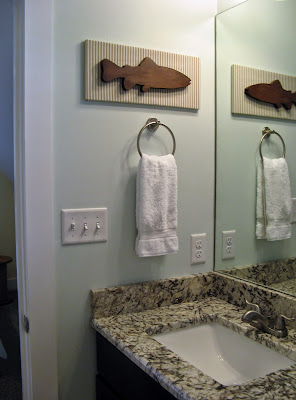
This was one of my "leftover" projects. This means that all the materials were leftover from previous projects I had worked on. These are my favorite types of projects because it means they are FREE!!! Here's the piece of art in it's spot in one of the guest rooms at our cottage. I painted the walls a pale aqua (this is actually a 50% mix of Tidewater by Sherwin Williams #6477).
The beige ticking stripe fabric works well with the shower curtain (also beige) and provides a good contrast for the dark stained fish cut-out. The overall neutral color of this piece stands out nicely on the aqua blue painted walls.
 |
| Beige Shower Curtain in Bathroom |
LIST OF SUPPLIES
- Wood fish cutout - The wooden cutout was a prototype made by a friend as we were figuring out a plan for this school of fish wall art project. See photo of that finished project below:
 |
| Wood fish Cutout |
- Stain - The stain was also leftover from the school of fish wall art project. I wear latex gloves when applying this stain. I used an old sock to apply the stain to the wood fish. In addition, I used a small paint brush to get the stain into some of the crevices. To finish the fish after staining, I had an almost empty can of spray satin polyurethane - just enough to coat the fish.
 |
| Gel Stain |
- MDF (Medium Density Fiberboard) - Any solid piece of wood or material will do as the base for this type of project. As long as it is solid - the material does not matter as it will ultimately be covered with fabric. The piece I used was an extra piece of MDF from the corner shelves project now in progress. (That post coming soon.).
- 2 Screws - The screws are necessary to ultimately attach the wood fish to the fabric covered panel (from the back). The screws needed to be long enough to go through the MDF, and then halfway through the depth of the fish. I found a couple in my miscellaneous screws jar. Here is the process I went through to prepare the base and the fish:
- NOTE - All this should be done prior to covering the piece of MDF in fabric. You will not attach the fish until you have covered the MDF base in fabric.
- I placed the fish on the MDF base and I outlined the location of the fish.
- I removed the fish and I chose two spots on the MDF to drill the holes for the screws.
- Next step - drill the holes in the MDF.
- I held the fish in place on the MDF base again, and used a sharp pencil to poke through the holes of the MDF and mark the placement of the holes on the fish.
- I then drilled pilot holes on the back of the fish (at the points I just marked) being careful to only drill halfway through the depth of the fish. You can put masking tape on the drill bit to mark the depth you need to help prevent drilling too deep.
- Don't attach the fish yet - you will do this after the MDF is covered in fabric.
- Fabric - This was beige ticking stripe fabric was leftover from the pillow shams I made for the aqua bedroom at the cottage. The fabric was adhered to the piece of MDF with a staple gun (by wrapping the fabric around to the back and stapling). Pay particular attention to the corners and make these as neat as possible. Once the fabric was in place - I attached the fish by using two screws going in from the back through the pre-drilled holes in the MDF, and into the pre-drilled pilot holes on the fish.
 |
| The fabric used was leftover from the pillow shams from this guest bedroom. |
 |
| Final piece in it's place in the guest bathroom |
This project makes me take a second look at the rest of my leftover supplies and get the creative wheels turning to see what I can come up with. . . hmmmm. . . .
Here are similar pieces I made earlier for a friend's little boy's room. See photos below and links to those posts.


No comments:
Post a Comment