Thursday, December 20, 2012

BURLAP WREATH CHRISTMAS CARD HOLDER


Burlap Wreath Christmas Card Holder
 
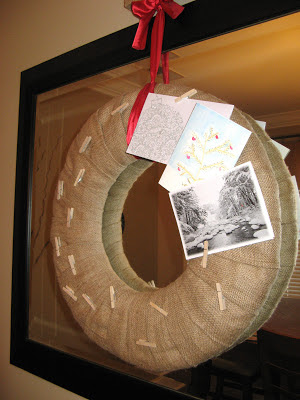
This idea grew out of the leftover strips sewn for our burlap garland.  (The burlap garland was made to decorate the columns in our entryway.)  We needed a place for Christmas cards and my first thought was to hang this like garland elsewhere in our home and clip cards to it with clothespins.  After playing around with it for a little while – the project morphed into a wreath.  Here is what I did…
I made a round doughnut shaped base out of foam board and covered the base with three layers of quilt batting.  The strategy I used here was - use spray adhesive on the base, and then plopping it down on a piece of quilt batting – then cutting it out and repeating this process three times (spray-plop-cut). 

What I ended up with was a foam-board-doughnut topped with three layers of quilt batting.  All I had left to do was loosely wrap the burlap around the base overlapping an inch or two with each layer, and adhering the ends in the back with a hot glue gun.  I emphasize “loosely” wrapping so you have enough slack in the strips to easily clip your cards to the burlap.  I suggest mini clothespins as you don’t really need the big ones to hold cards (I found mine at Hobby Lobby).  The wreath hangs over a mirror using a large piece of red satin ribbon for contrast.
Burlap Wreath Christmas Card Holder
 
Burlap Wreath Christmas Card Holder
 
 
If you are a fan of burlap - the wall art around the mirror was made from potato sacks and can be found on my other post.  :o)
 

POINTSETTIAS AND BURLAP


Silk Poinsettias, Burlap Base

This was an easy project for these silk poinsettias. They were originally outfitted with different colored foil, glued to the base of the pots (one gold, one silver and one red). This was festive, but not the look I was going for. Here is what I did: (1) Simply take a large circle of burlap. (2) Hem the edges on a sewing machine. (3) String ribbon through the burlap so you can gather it around the base of the pot and tie it off.
Burlap around flower base

Burlap is an inexpensive fabric and provides for a rustic feel.  You could always consider other types of fabric to bring a different look.  Another inexpensive option could be brown craft paper or other types of wrapping paper.  (Would likely want to choose a more heavy duty wrapping paper to avoid durability issues and tearing.)

For other ideas for Christmas Décor, see my CHRISTMAS page.

TREE BRANCH CHRISTMAS TREE


Tree Branch Christmas Tree close up
 
This is one of my favorite new Christmas decorations.  The tree branch was picked up in the woods around our neighborhood and set up in a standard terra cotta pot and held in place with Quikrete.  Then I placed it inside this rustic wooden vase (purchased at Hobby Lobby) and then used dried moss (also purchased at Hobby Lobby) to cover the concrete base.  Especially sparkly ornaments were selected to contrast with the rustic nature of the branch and the vase.
 
Tree Branch Christmas Tree
 
Dried Moss Covering Concrete Base
(Dried moss covering Base of concrete filled pot.)
 
Note - The one down-side to this project is it takes up a lot of room in storage and is rather delicate - so keep this in mind when choosing a branch.  I suppose keeping it out year round is an option where you can replace the Christmas ornaments with other seasonal items throughout the year.

For more of my Christmas posts see the CHRISTMAS page...

UPCYCLED FRAMED ART #2


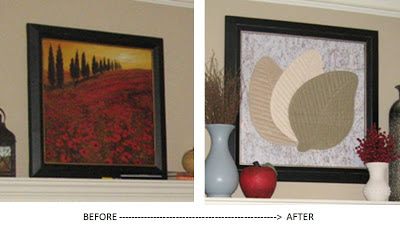
Framed Art Before and After
 
The photo above shows the original framed art purchased from Hobby Lobby.  It’s a pretty Tuscan print, but rather dark and we were going for a lighter feel in the room.  Purchasing a different piece of art this large could be expensive, so my goal was to re-work what we already had.  The frame did not have glass on the front (the print had a reflective coating on it), so I had glass cut to fit the frame (about $30 at Hobby Lobby).  Some touch up was done on the frame to change the gold accents to silver.  This was done using a small paintbrush and silver metallic craft paint.
 
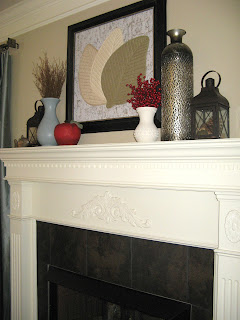
Framed Art over Mantel
 

The background is foil backed cork wallpaper by Candice Olsen.  I love this stuff as it reminds me of birch bark. (I used this wallpaper on anotherwall art project and so I had some left over and felt it worked perfectly here as an interesting background behind the leaves).  The wallpaper is expensive, but since it was leftover from another project I took the liberty to consider it free for budget purposes.  I had also considered using some leftover fabric for the background but I think the wallpaper was my best choice.

The leaves are quilted placemats purchased years ago at either a Marshall’s or a TJ Maxx.  They caught my attention and I had been holding on to them ever since looking for the perfect project.  I originally thought I would put them in three different frames and create a series, but I think fanning them out in one frame works quite well here.  They were bought so long ago, I have to guess on what I paid for them – probably about $3 a piece.  Since I had them for so long I also considered them ‘free’ within the budget for the room.

So…for about $30 we had a brand new piece of large art for over the mantle!
 
Check out my other upcyled framed art project using fabric and scrapbook paper...