After moving into our new home, we hired a contractor to
replace all the wire shelving in our closets with wood shelves and metal
bars. We also had a few custom shelves
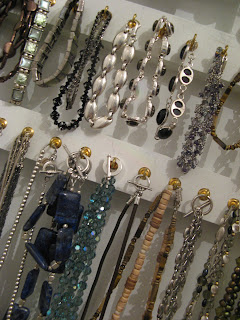
and drawers added to our master closets along with this recessed jewelry
cabinet. It’s great to be able to see everything all
at once, and it’s super easy to keep it all organized.
The jewelry cabinet is located behind the closet door – a space
tough to make use of anyway. Here is what they did… I started with the
wall mirror and asked them to use it as the door (it’s one of those cheap wall
mirrors you find just about everywhere).
They mounted the mirror onto a piece of thin board for added
stability. Then they cut a section of
drywall out between two studs inside the closet (the mirror was just about the perfect
width for a door to accommodate the space between the studs). Next, they framed out the interior of this
space to match the size of the door and attached the door with piano
hinges. So . . . what was left was a
door covering an unfinished inset box in the wall. The rest I did myself. . .
1.
To plan out the location of all the hooks – I started
by measuring the size of the inset box in the wall and cut out a piece of paper
the same size and laid it on the ground.
2.
Then I took out all my jewelry and started
organizing it on the paper to determine where I would need to hang hooks for
rings, bracelets, and necklaces of various lengths. It ended up looking something like this . . .
3.
Once I had a plan, I took scrap 1x2’s and cut
them to size. These 1x2’s are what hold
the cup hooks.
4.
I primed and painted the inside of the cabinet
and the individual pieces of 1x2’s. I
used the same high gloss white paint used on the rest of the trim/shelving in
the closet. I’m a big advocate of using
primer, especially on spaces that can use the added durability. It’s an extra step, but will prolong the life
of any painted area.
5. I installed the cup hooks on the 1x2’s before mounting them inside of the cabinet. I was sure to leave enough space between each hook (about 1 inch). I would not recommend try to paint after applying the cup hooks - this would be very tedious work and would be difficult to keep the paint off the hooks.
6. Liquid Nails was used to attach the 1x2’s to the
inside of the cabinet.
7.
Finally, I caulked all the edges with white calk
to give it a finished look (tedious but worth it).
I have seen cabinets like this that can be purchased and
mounted on a wall. (Perhaps you can even
figure out how to recess these, I’m not sure.)
Either way, it’s wonderful having all your jewelry within view when
getting dressed and choosing an outfit and accessories. A later addition was a magnet clasp to keep
the door completely shut.
This jewelry cabinet is just one of the elements I incorporated into my closet. If you are interested in some of my other closet organization ideas - see my post here: CLOSET ORGANIZING TIPS
See my ORGANIZE page for more storage and organization ideas.
