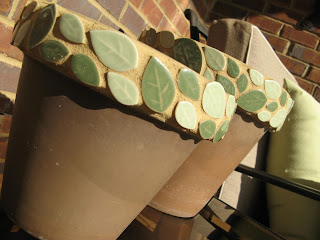
This is my latest mosaic project. The clay pots were purchased last year from Lowe’s – these are a cheaper alternative to the fancy ceramic pots, and the brown color makes them look ‘higher-end’ than the typical terra cotta. I believe they also come in gray. The leaf shaped tiles were purchased from www.monstermosaics.com just because I thought they were cute. I was glad to finally figure out what to do with them.
Updated 4-22-2014
I just realized I had some step-by-step photos of this project and decided to post the details of the process I used to make these. This is an easy beginner mosaic project and I really enjoy the simplicity of the design. This is a great way to try out the mosaic process if you have never done anything like this before.
SUPPLIES
- Clay Pot
- Mosaic Tiles
- Tile Adhesive (you can get small containers of this at Lowe's or any hardware store)
- Small Craft Stick (to apply adhesive to back of tiles, a plastic butter knife, or popsicle stick can work here as well)
- Wet Rag - for wiping hands and extra adhesive off of pot and tiles.
- Painter's Tape
- Rubber Gloves (for grouting - the grout sucks the moisture out of your hands)
- Sanded Grout (only a small amount is needed - buy a smaller bag)
- Small Container (to mix grout)
- Plastic Spoon to mix grout
- Pallet Knife or Plastic Butter Knife (to apply grout)
- Sponge
- Small Bucket for Water
- Plastic Table Cloth (the tile adhesive and grouting can be messy).
- Buffing Rag (Old t-shirt)
- Grout Sealer and small brush to apply sealer
(1) I wasn't sure if I was going to have enough tiles. I cut paper templates the size of the edges of the two clay pots I wanted to cover with tiles. Then I laid out the tiles on the paper to confirm I would have enough.
(2) Glue the tiles to the edge of the pot using tile adhesive. NOTE: I like to use Weldbond Glue on a lot of my mosaic projects - it's great stuff. However, on vertical surfaces, standard tile adhesive can be a better option. It is thicker and your tiles will be less likely to slide off the pot.
(3) After the tile adhesive is dry (about 24 hours is a good time to wait) you are ready to grout. Apply painters tape to the edge of the pot to mark a clean line where the grout will end
(4) Mix the grout according to package instructions. The consistency of "peanut butter" is a good thing to shoot for. Turn your clay put upside down on the table. Apply the grout over the tiles. Use a palette knife/butter knife, or your fingers to mush the grout into the cracks between the tiles. Smooth over surface to remove excess grout with the knife or your fingers.
(5) With a damp sponge, start wiping the grout off the surface of the tiles. Be sure to remove any grout that has found it's way on the side of the pot. Continue rinsing your sponge and wiping until the tiles are fairly clean. A slight film is unavoidable and can be buffed off later. NOTE: the sponge should be damp and not soaking wet.
(6) Turn pot over and smooth out the grout along the top of the pot with your fingers.
(7) Remove the painters tape before the grout dries, and continue to clean up the excess grout off the pot.


No comments:
Post a Comment