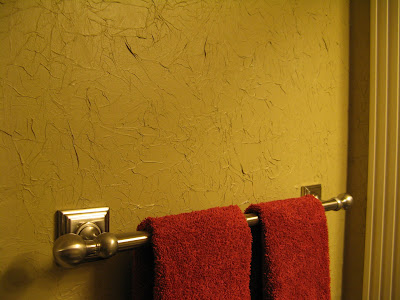
This is a tissue paper and paint technique. I'm not typically a big fan of paint texture techniques - like trying to make a wall look like leather, marble, burlap, etc... However, I like this technique because you are not trying to make the wall look like anything in particular - it is just a cool texture.
This technique is a great option for painting if you have imperfect or damaged walls. For example - walls after removing wallpaper, bathroom mirrors applied with adhesive, or anything else that has you left with some sort of damage to drywall. If you wish to paint these surfaces, you will likely have to patch and resurface the drywall (either making them perfectly smooth or mimicking existing wall textures). Unless you are good at this - you may need to hire someone to do this for you to make it look good. Going with this tissue paper technique, you can make repairs yourself and patch walls the best you can (which probably is not perfect) and the tissue paper will cover minor imperfections.
I orginally found several different instruction techniques online and here is the process I ultimately followed:
Supplies:
- Packages of White Tissue Paper (buy a more than you think you will need - you can always use the excess for giftwrapping :o)
- Paint (Eggshell finish) (enough paint to coat the square footage of the space twice)
- Paint Roller & Tray
- Brush for cutting-in
- Wet Rag (for your hands)
- (Some reccomend using wallpaper paste for the first coat, but I have found paint works just fine).
- I would recommend doing a small room like a powder room or just a single accent wall.
- Plan to do an entire section of wall at a time. This is because you need to maintain a wet edge. If you let a section dry, and then continue, you will see the edges of the individual tissue paper pieces. The benefit is - if you keep a wet edge, the pieces blend together seamlessly.
- Having two people to do this process is a plus. One person can manage the tissue paper, and the other the paint roller. Otherwise, it is a challenge to maintain a wet edge.
- Start by cutting the tissue paper into managable pieces in various sizes. If you have a large wall approximately 2 foot x 2 foot pieces are good. Cut some smaller pieces as well. Smaller pieces will be necessary when you go around windows, light switches, and into small spaces.
- Crumple up all the cut tissue paper pieces into balls.
- Take the tissue paper balls and lightly flatten them out and place into piles (by size) in a space that is easily accessible to the area you are painting.
- I highly recommend doing a test run on a spare piece of drywall. Just so you have an idea of the process before beginning on an actual wall. I did this and I was very glad I did.
- First, go ahead and cut-in with just the paint around windows and the edges of the walls with a brush.
- Now it's time to start the tissue paper part. Start in a corner and remember your strategy is to maintain a wet edge.
- Roll paint on wall in area slightly larger than the piece of tissue paper you are about to place.
- While the paint is still wet, place the piece of tissue on the wall, being sure to go almost to the edge of the wall leaving about 1/4 to 1/2 inch of space. Don't flatten the tissue too much. Just pat the tissue into the paint with your finger tips so it sticks to the wall - the paint is actually working as a type of adhesive. For the end result, you want the tissue paper to crumple up on the wall and have a wrinkled texture when the roller goes over it. Don't over think this step, just get the tissue on the wall and move on to the next step.
- Immediately roll over the tissue with the paint roller to flatten out the paper and coat it with paint. If any area of tissue seems to be sticking-out from the wall - run your finger tips over the area to flatten and then re-roll. Wipe the paint off your hands with the wet rag.
- Continue with the next pieces being sure to maintain a wet edge. The next pieces should overlap the each piece 1 to 2 inches. If you are moving quickly and maintaining a wet edge, you won't see the edges of the pieces. Repeat Steps 4-7.
- Touching up after the paint dries is inevitable. The tissue will soak up paint as it dries and you will see some white spots on the tissue. If there are areas of tissue sticking out after it dries, just dab some paint on the wall and smush the area down with your fingers. Once again, a wet rag will come in handy.
- An optional last step is to lightly dry-brush over the textured walls with a contrasting color or metallic paint. I haven't done this myself, but I have seen examples of this. Once again, I recomend doing a test run.
Here are a couple more photos from our first attempt at using this technique...


No comments:
Post a Comment