Thursday, January 26, 2012

UPCYCLED FRAMED ART

Upcycled Framed Art

I'm excited about the new word I'm adding to my vocabulary - "upcycled".  I'm 'up'dating this post (no pun intended) as I think this term applies - taking something you were tired of and no longer have use for, and turning it into something great.

I had several framed pieces of Tuscan landscapes, and was ready for something new.  Buying new art seemed like a waste, so I refurbished the existing ones.  I covered the Tuscan prints with scrapbooking paper in a faux burlap print (I placed several layers of cardboard underneath to level the paper on the mat, and I used blue painters tape for a temporary hold, just in case I want to go back to the Tuscan prints at a later time.)  The focal point in the center is simply fabric around cardboard pieces.  The fabric was leftover from the comforter cover I cut up to make pillow shams and a valance for the same room.  Total investment was less than $2 for the pieces of scrapbooking paper.


Framed artwork prior to changes
These are the framed art pieces I started with


Upcycled Framed Art
These are the finished upcyled pieces made with fabric and scrapbooking paper

Upcycled Framed Art in Guestroom
You can see the art pieces on the wall in the guest room...

If you are curious about the tree branch on the wall - see post TREE BRANCH WALL ART.


NAPKIN WALL ART

Napkin Wall Art

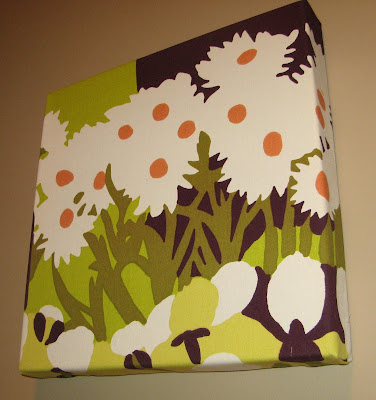
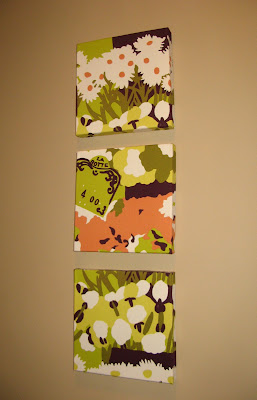
These are cloth napkins purchased from Crate & Barrel stretched over a frame.  I purchased stretcher-bars to make the frame (the same kind used by artists to stretch canvas, so they are made for the purpose of attaching fabric).  I purchased them from www.frenchcanvas.com.  These are put together with a rubber mallet (no hardware required).  I used a staple gun to attach the fabric. Just be careful with the corners.  Neat corners will make or break the final look of these types of projects.

Napkin Wall Art

About the stretcher-bars:  these are ideal because they can be ordered in any size, are relatively inexpensive, are put together with a rubber mallet (no hardware), are made for the purpose of attaching fabric, and are lightweight and easy to hang.  I have used stretcher bars from this same source for a number of other types of projects.

See ABSTRACT BIRCH FOREST and POTATOE SACK WALL ART for similar projects.


Sunday, January 22, 2012

MOSAIC STEPPING STONES

Mosaic Stepping Stones in Garden Bed

Mosaic stepping stones made from broken ceramic tiles.  The tiles were leftover pieces from our floor installation saved by the builder.  Tiles were adhered to a cement base with liquid nails as the adhesive. (I made round stepping stones using quick concrete mix and cake pans.)

Mosaic Stepping Stones in Garden Bed

Mosaic Stepping Stones in Garden Bed
 
 
Update 6-3-2014
 
Here is an illustration of what I did for the natural stone landscaping border.  The border was made of natural stones cemented to a base of landscaping bricks.
 
 
A similar border was done around the trees in the backyard as well. See the post DIY STONE LANDSCAPE BORDER 1

MOSAIC WALL ART I

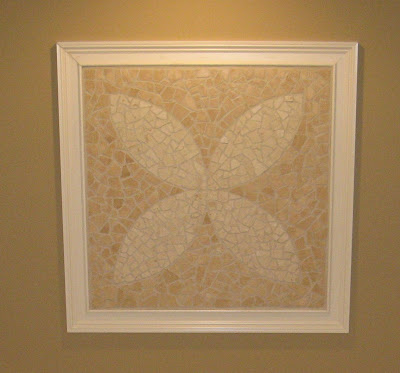
Broken Stone Tile Mosaic Wall Art

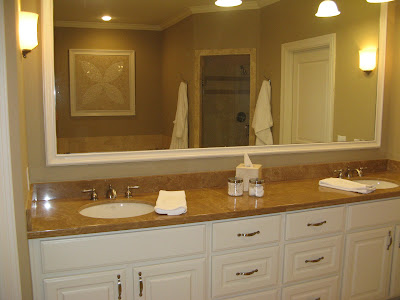
This was my first big mosaic wall art project.  The mosaic itself is about 4' by 4'.  It is made from broken travertine and marble tiles (to compliment the honed travertine tiles throughout the bathroom).  I created the design on mesh and then cut it into pieces to install it on the wall.

Broken Stone Tile Mosaic Wall Art

Broken Stone Tile Mosaic Wall Art


In our new home, I did a similar but smaller type of piece with a single leaf design - see post MOSAIC WALL ART II.


Friday, January 20, 2012

TISSUE PAPER WALL TREATMENT

Tissue Paper Wall Treatment

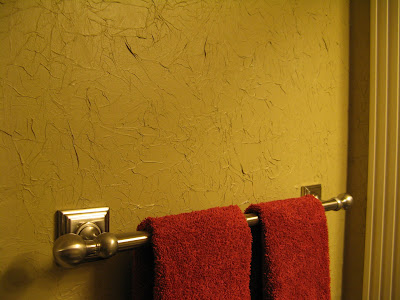
This is a tissue paper and paint technique.  I'm not typically a big fan of paint texture techniques -  like trying to make a wall look like leather, marble, burlap, etc...  However, I like this technique because you are not trying to make the wall look like anything in particular - it is just a cool texture.  

This technique is a great option for painting if you have imperfect or damaged walls.  For example - walls after removing wallpaper, bathroom mirrors applied with adhesive, or anything else that has you left with some sort of damage to drywall.  If you wish to paint these surfaces, you will likely have to patch and resurface the drywall (either making them perfectly smooth or mimicking existing wall textures).  Unless you are good at this - you may need to hire someone to do this for you to make it look good.  Going with this tissue paper technique, you can make repairs yourself and patch walls the best you can (which probably is not perfect) and the tissue paper will cover minor imperfections.

I orginally found several different instruction techniques online and here is the process I ultimately followed:

Supplies:
  • Packages of White Tissue Paper (buy a more than you think you will need - you can always use the excess for giftwrapping :o)
  • Paint (Eggshell finish) (enough paint to coat the square footage of the space twice)
  • Paint Roller & Tray
  • Brush for cutting-in
  • Wet Rag (for your hands)
  • (Some reccomend using wallpaper paste for the first coat, but I have found paint works just fine).
Preparation:
  1. I would recommend doing a small room like a powder room or just a single accent wall.
  2. Plan to do an entire section of wall at a time.  This is because you need to maintain a wet edge.  If you let a section dry, and then continue, you will see the edges of the individual tissue paper pieces.  The benefit is - if you keep a wet edge, the pieces blend together seamlessly.
  3. Having two people to do this process is a plus.  One person can manage the tissue paper, and the other the paint roller.  Otherwise, it is a challenge to maintain a wet edge.
  4. Start by cutting the tissue paper into managable pieces in various sizes.  If you have a large wall approximately 2 foot x 2 foot pieces are good.  Cut some smaller pieces as well.  Smaller pieces will be necessary when you go around windows, light switches, and into small spaces.
  5. Crumple up all the cut tissue paper pieces into balls.
  6. Take the tissue paper balls and lightly flatten them out and place into piles (by size) in a space that is easily accessible to the area you are painting.
Directions:
  1. I highly recommend doing a test run on a spare piece of drywall.  Just so you have an idea of the process before beginning on an actual wall.  I did this and I was very glad I did.
  2. First, go ahead and cut-in with just the paint around windows and the edges of the walls with a brush.
  3. Now it's time to start the tissue paper part.  Start in a corner and remember your strategy is to maintain a wet edge.
  4. Roll paint on wall in area slightly larger than the piece of tissue paper you are about to place.
  5. While the paint is still wet, place the piece of tissue on the wall, being sure to go almost to the edge of the wall leaving about 1/4 to 1/2 inch of space.  Don't flatten the tissue too much.  Just pat the tissue into the paint with your finger tips so it sticks to the wall - the paint is actually working as a type of adhesive. For the end result, you want the tissue paper to crumple up on the wall and have a wrinkled texture when the roller goes over it.  Don't over think this step, just get the tissue on the wall and move on to the next step. 
  6. Immediately roll over the tissue with the paint roller to flatten out the paper and coat it with paint.  If any area of tissue seems to be sticking-out from the wall - run your finger tips over the area to flatten and then re-roll.  Wipe the paint off your hands with the wet rag.
  7. Continue with the next pieces being sure to maintain a wet edge.  The next pieces should overlap the each piece 1 to 2 inches.  If you are moving quickly and maintaining a wet edge, you won't see the edges of the pieces.  Repeat Steps 4-7.
  8. Touching up after the paint dries is inevitable.  The tissue will soak up paint as it dries and you will see some white spots on the tissue.  If there are areas of tissue sticking out after it dries, just dab some paint on the wall and smush the area down with your fingers.  Once again, a wet rag will come in handy.
  9. An optional last step is to lightly dry-brush over the textured walls with a contrasting color or metallic paint.  I haven't done this myself, but I have seen examples of this.  Once again, I recomend doing a test run.
It's been years, but I'm sure there are instructional videos out there on the web.  Search for 'tissue paper paint technique'.

Here are a couple more photos from our first attempt at using this technique...

Tissue Paper Wall Treatment

Tissue Paper Wall Treatment

CLIP RING BOX PLEAT VALENCE

Clip Ring Box Pleat Valence

Turn any flat rod-pocket valance into a 'tailored-look' box pleated valence with clip rings. The pleats are not sewn, they are held in place by the clip rings themselves. Make as many pleats as the width of your valence permits.  The time consuming part is measuring and spacing the pleats.  For the box pleat look you will need two clip rings per pleat.  Special thanks to my friend Heather for allowing me to play decorator in her house!  Here's a close up...

Clip Ring Box Pleat Valence - Close Up

Also made a pillow with leftover fabric...

Pillow


If you like this idea, check out another option in my CLIP RING PLEATED VALENCE post.  (same idea - just small pleats with a single clip instead of box pleats)


CLIP RING PLEATED VALENCE

Clip Ring Pleated Valence

Turn any flat rod-pocket valance into a 'tailored-look' pleated valence with clip rings.  The pleats are not sewn, they are held in place by the clip rings themselves. This one has three pleats per clip.  Make as many pleats as the width of your valence permits.

This particular valance started out as a long valence from a large window.  I really hated the idea of cutting it down since I had taken some time sewing it, so I played around with the clip rings and came up with the pleats.

The time consuming part is spacing the pleats.  Take your time measuring in order to place them. You can use single/double/triple pleats depending on the width of the fabric valence compared to the width of your window.  Just play around with it and figure out what works for your window.  Adjustments are easy since you are dealing with movable clips and not stiching that needs to be torn out and re-sewn.

Clip Ring Pleated Valence

Clip Ring Pleated Valence


If you like this idea, check out my other post CLIP RING BOX PLEAT VALENCE (similar concept using two clips to creat a box pleat look).


MOSAIC TABLE TOP

Round Mosaic Table Top

Created with 1" vitreous glass mosaic tiles, some broken with tile nippers and some full tiles.  Base is a round of MDF placed on top of a table from Pottery Barn.  The design was taken from a book on mosaics and slightly modified.  I think the black grout really works with these tile colors.

Round Mosaic Table Top

GLITTER COKE BOTTLES

Glitter Coke Bottle Christmas Decoration

Check out these Coke bottles filled with glitter for Christmas decor.  These bottles were originally destined for the recycle bin, but I thought they looked kind of cute on display, only they needed just a little something. . .   The glitter was adhered to the inside of the bottle with spray glue. 

Supplies
  • Empty Glass Coke Bottles (clean and dry)
  • Spray Glue (update 3/1/2012 - I just saw on another blog where someone used Pledge floor care finish as an adhesive on this type of project.  I haven't tried it, but it may be a better option... http://www.plumadorable.com/four-valentine-dcor-ideas-free-printable )
  • Glitter
  • Masking Tape
  • Plastic Grocery Bags (one per bottle)
  • Container for Bottles (for display)
  • Bowl/Tray (to dump excess glitter so it can be re-used) I used an aluminum foil pan

Directions (Updated 1/17/2013 with photos)
  1. Tape off a clean line on the inside top of the bottles (to create a clean edge where the glitter will stop), and tape around the top outside of the bottles as well (to prevent over-spray onto the bottle where you do not want it). 


  1. Take a plastic grocery bag with a small hole cut into it.  Put the top of the bottle through the small hole in the bag and tape the bag to the bottle covering any exposed glass between the taped area and the bag.  Explanation: when you hold the bottle to spray in the glue, the plastic should cover your hand and the rest of the bottle to prevent the overspray from going everywhere.


  1. Take the spray glue and place the nozzle so you are spraying directly into the bottle.  (The hand you are using to hold the bottle should be under the plastic bag).  Spray the glue until it appears you have coated the inside of the bottle entirely.  Do not worry about drips or globs - the glue will dry clear and you won't notice them.
  2. Wait the amount of time indicated on the spray glue can before adding the glitter.  Pour glitter inside the bottle, close off the top and shake.  If necessary, add more glitter and shake until all inside edges are coated.  Pour excess glitter into your bowl/tray and use on next bottle.
  3. Remove tape and plastic bag and throw away.
  4. Place finished bottles in container to display.  I used a container purchased from Hobby Lobby filled with dried moss, and added a red ribbon.
Placing the bottles with my stuffed polar bears was an afterthought, but certainly reminds me of the classic Coke commercials!

Glitter Coke Bottle Christmas Decoration with Stuffed Polar Bears
 
For more of my Christmas posts see the CHRISTMAS page...
 
If you are a Coca Cola fan - you might be interested in this post where I painted my own version of a Coca Cola Crate in these soft aqua colors for our beach cottage.
 
See the post here: BEACHY WOODEN COCA-COLA CRATE


TREE BRANCH WALL ART

Tree Branch Wall Art

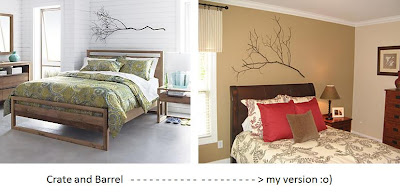
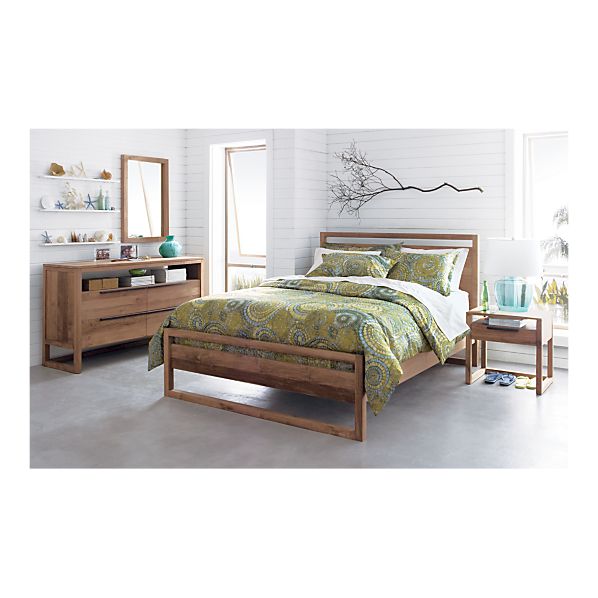
Tree branch wall art - I got the idea from a Crate and Barrel catalog. The branch was picked up off the ground while walking around our neighborhood. My husband likes to claim credit for spotting it.

Tree Branch Wall Art

This branch worked well because it was pressed flat underneath other debrit.  (You need a branch that is relatively flat otherwise it will not hang well).  All I did was spray it with a matte varnish and hung with several small nails.  Free wall art!  Here's a close-up...

Tree Branch Wall Art

At Christmas time I hang a single red bulb on the branch...

Tree Branch Wall Art - at Christmas


Inspiration - Photo from Crate and Barrel Catalogue


I'm an advocate of hanging items on the wall that are not traditionally what people might consider "wall art".  Here are some example of other posts that coincide with this concept...

STAIRWAY ART - PALLET FRAME
BARN DOOR WALL ART
GARDEN GATE WALL ART

MOSAIC BACKSPLASH

Broken Ceramic Tile Mosaic Backsplash

This is a broken ceramic tile mosaic backsplash on our laundry room sink.  I used mostly broken ceramic tiles saved by builder from the floor installations in our home.  I added a couple lines of the tumbled marble 2x4 tiles which were purchased on mesh squares. 

The design was created on mesh and then cut into pieces to mount on wall.  I find cutting it into pieces before installing to be absolutely necessary.  The thickness of these tiles (as opposed to small thin mosaic tiles) makes these types of projects very heavy.  I've done several wall mosaics on mesh of this style, and it always pains me to cut them up to install them.  I have this fear of the end result looking completely crooked and miss-shaped, but it always works out in the end!

Here's the before picture...


Broken Ceramic Tile Mosaic Backsplash - Before
Before Photo

...and a closeup to show detail...

Broken Ceramic Tile Mosaic Backsplash - Close Up


Here are a couple other similar broken tile wall projects...

  • MOSAIC WALL ART I
  • MOSAIC WALL ART II


  • I have a current project in the works where I plan to give more detail and photos on the process I follow to complete these types of projects.  I'm working on a large sea turtle mosaic to go in the master bathroom of our beach cottage.  Wish me luck on the installation - I'm at the point where I need to cut the piece up to install it (Yikes!). . .

    BURLAP TABLE RUNNER

    Burlap and Crystal Table Runner

    I went a little crazy with buralp this Christmas.  I love the rustic look and fortunately it's pretty cheap.  This project is burlap fabric sewn into a table runner.  I added faux crystal gems for embellishment.  The gems were purchased from Hobby Lobby.  You can get them in individual packets or a large container.

    Burlap and Crystal Table Runner - On Table

    Burlap and Crystal Table Runner - On Table
     
     
    For more of my Christmas posts see the CHRISTMAS page...

    BURLAP GARLAND

    Burlap Christmas Garland

    This is burlap garland made from sewn burlap strips combined with silver ribbon.  I knotted the burlap and ribbon combination at regular intervals for interest.  A long complicated post did not seem necessary here.  It really was that simple.  The time consuming part was cutting and sewing the burlap strips (basically sewn tubes that had to be turned inside out).

    An easier way to do this would be to simply purchase burlap ribbon, rather than making your own out of yards of fabric.  I had a bunch of yards of burlap fabric - so...

    Burlap Christmas Garland
     
    For more of my Christmas posts see the CHRISTMAS page...

    BURLAP CHRISTMAS TREE

    Burlap Christmas Tree

    This tree was made from burlap pockets.  I sewed the small burlap pockets on a sewing machine.  Very simple - I cut rectangles of fabric, folded them in half, and sewed them up on three sides.  This enabled me to turn them inside out.

    The base is a paper-mache tree form purchased from Hobby Lobby.  It was shorter than I wanted it to be, so I extended it.  I did this using poster-board (added to the bottom of the form and attached with duct tape)   

    The burlap pockets were hot-glued on to the tree form.  I started at the bottom, and therefore each subsequent layer covered up the raw edge of the pockets from the prior row.  On the top I hand stitched the raw edges of two pockets closed so the point of the tree had finished sewn edges. 


    Faux crystal gems were added with hot glue.  (These were purchased from Hobby Lobby as well.)  They sell them in a big container - much cheaper than buying them a few at a time in individual packets.  I like the contrast of the rustic burlap and sparkly gems.

    Burlap Christmas Tree
     
    Here are a few other Christmas décor posts where I used burlap...